Skipping ahead, because I never seem to get the time to actually catch up on the blog...
We finished our cruising in early September last year (2024), put the boat in storage, found a cat sitter for the cats, and flew back to the USA for October through early December.
We didn't make it up to the Red Sea this year. Dave started on an "upscale our electrical capacity" project when we got back to the boat in December. By early January 2025, it became obvious that we weren't going to get done in time to catch the right season to cross the Indian Ocean and up the Red Sea (must leave Malaysia/Thailand by mid January). I was pretty upset at first--another whole year's delay! But Dave talked me down, and we ended up (so far) having a pretty good year.
In between bouts of working on the boat, we did some travel...
- Tasmania for 2 weeks in February (Australian summer)
- Sri Lanka for 2 weeks in March Download Our Trip Notes
- A 10-day Dive Trip to Misool (Raja Ampat, Indonesia) in April
Yes, I should have blogged all this, but I was too busy traveling, and making arrangements for the next trip.
May through July, we worked on the boat. Dave decided he wanted to Coppercoat the bottom, and to get the best finish (critical to Coppercoat success), he wanted to put our boat in the "shed". (A covered space at the marina). To go in the shed, you have to take the mast down. While the mast was down... You see how the ball of string unravels...?? One day I'll post a full list of all the stuff we have done on the boat this year.
So, looking ahead, we'll want to be finishing up all of our boat work, in a full court press, in November, get launched, and head for a shakedown cruise to Thailand. So if we wanted to go home, we had to do it sooner than our normal Oct-Dec trip.
As soon as we started talking about being in the US in Aug/Sep, Dave signed us up to do a presentation at the Seven Seas Cruising Association Gam that is held in the Annapolis area (Maryland, USA) Sep 26-28. Details on the SSCA Website. So now we're committed to staying at least that long.
Note to our Melbourne Friends, the SSCA Gam is coming back to Melbourne November 14-16 at the Front Street Park Community Center. Put it on your calendar, and watch for details on the SSCA Website here.
We've been enjoying catching up with friends and family in Florida... a few Friday nights at Melbourne Yacht Club... a few beach walks at sunrise. Amazon deliveries nearly every day. A mix of critical boat parts, specialty food items we can't get in Malaysia, and tech items.
We've got our passports in for renewal, as we were starting to run out of pages. We are also in the process of renewing our Captains Licenses--another big paper chase! We had planned to let them lapse until we found they might help with the "Schengen Shuffle" in Europe. (Non-EU citizens are limited to 90 days in 180 days in the entire EU, and being considered "crew" on a "ship" you can get around this issue, supposedly).
Dave made a whirlwind trip with some other WW2-crazy friends up to Pensacola, FL to see the National Naval Aviation Museum, and the Naval Diving and Salvage Center in Panama City, Florida.
But our time in Melbourne is coming to an end. In a few days, we'll pack all our stuff back into the storage unit, and set out in our new-to-us car for a month of traveling around the SE US.
The current plan is to drive straight back to Florida the first week of October, put the car in storage, and fly back to Malaysia, with a quick stop in San Diego to see Dave's son Chris.
Meanwhile, we've been really studying the ins and outs of the trip across the Indian Ocean and up the Red Sea. And planning what we're going to do when we finally hit the Mediterranean around May of next year.
Showing posts with label Maintenance. Show all posts
Showing posts with label Maintenance. Show all posts
Friday, August 29, 2025
Sunday, December 17, 2023
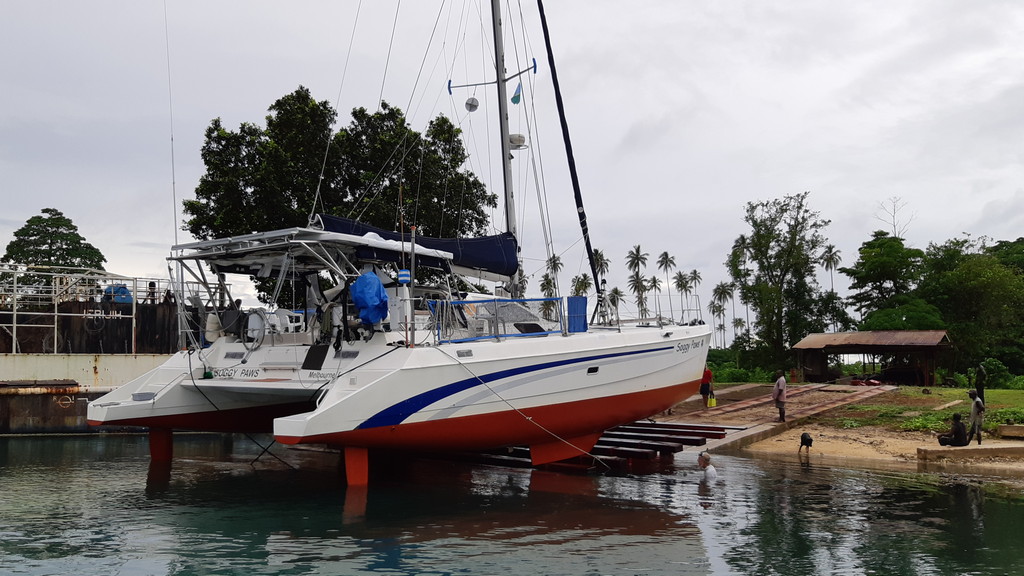
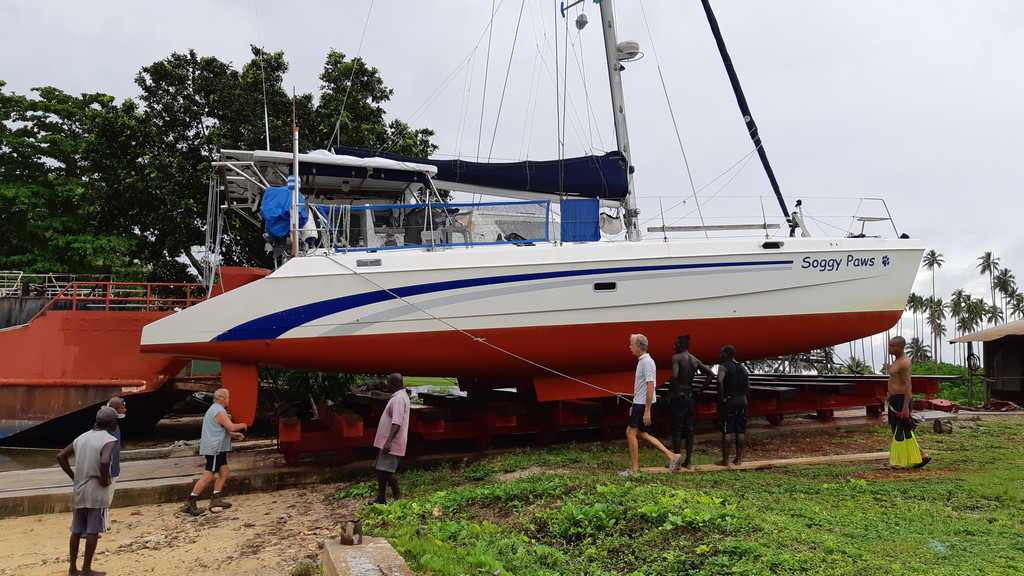
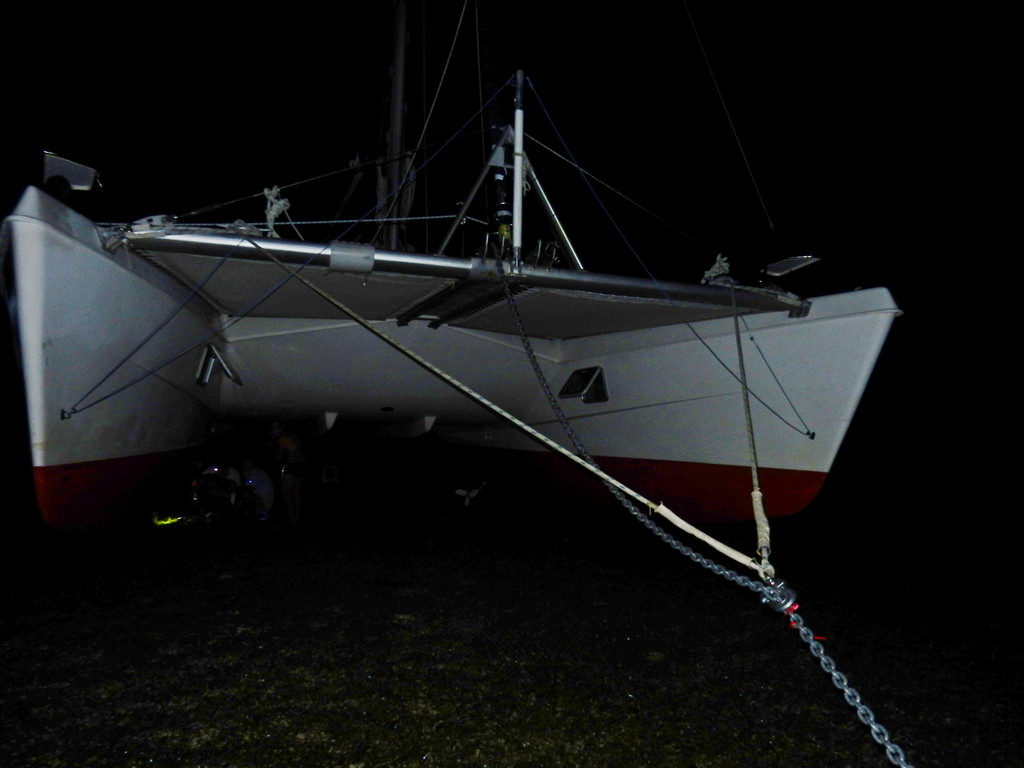
Finally Escaped from Pangkor Marina
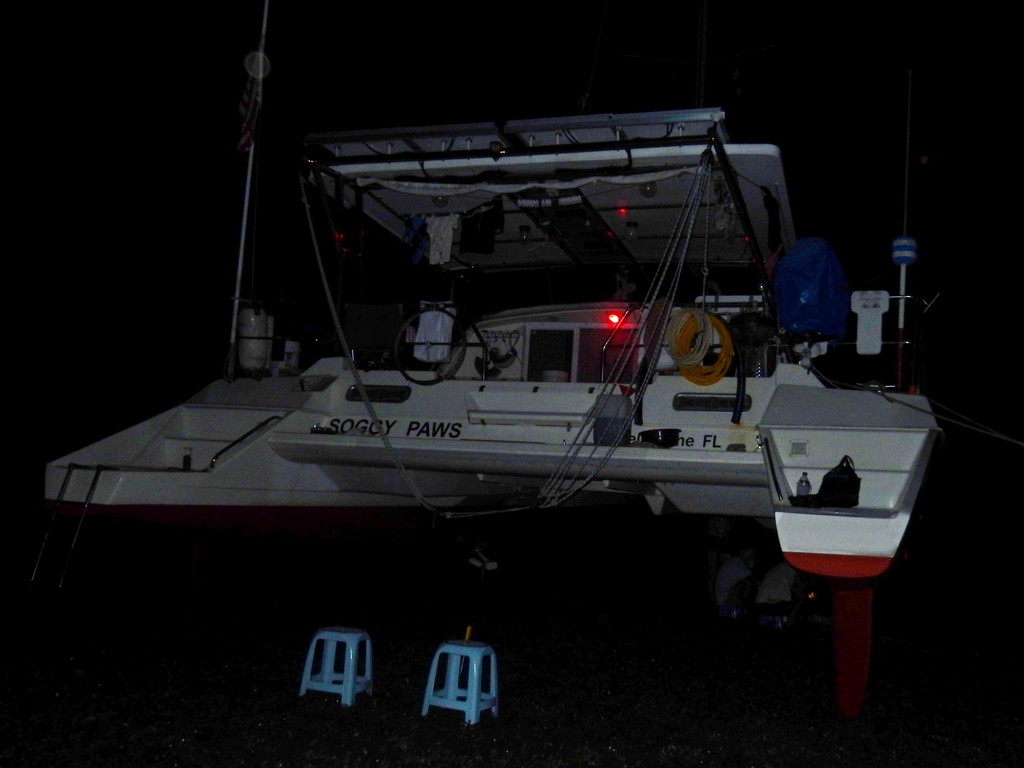
A few days ago, after 2 weeks of fairly frantic activity--completing boat projects, provisioning, getting cat annual visits, moving out of the condo, etc etc, we finally left Pangkor Marina.

Finally Underway!
It was bittersweet. While we are REALLY excited about getting out cruising again, we will really miss everyone, both staff and cruisers, at Pangkor Marina. The Pangkor staff is just fantastic. Led by James Khoo, but supported by Akina, Ruz, Adam, (and several others) in the office, and Shah, Fifi, Fikri, Akmal, (and several others) in the marina and yard, we couldn't have had a better place to spend a year. Yes, A YEAR!
James' monthly (and sometimes more often) BBQ's, where beer, soft drinks, and grilled meat are provided free by the marina, is just one of the thoughtful things that give the marina a very nice community feel. The amenities like a pretty well-stocked marine store (and help sourcing parts they don't stock, from anywhere in SE Asia), free wifi in the air conditioned "library", inexpensive housing across the street from the marina, rental cars by the hour, and a lively Whatsapp group, the marina feels like home.
We did, in all fairness, do two 2 1/2 months visits to the USA, 22 days in Vietnam/Laos, and a long weekend in Cameron Highlands. We got LOTS done that needed doing--most significant being stripping 8 years of bottom paint and getting a new "good for 4 years" bottom job.
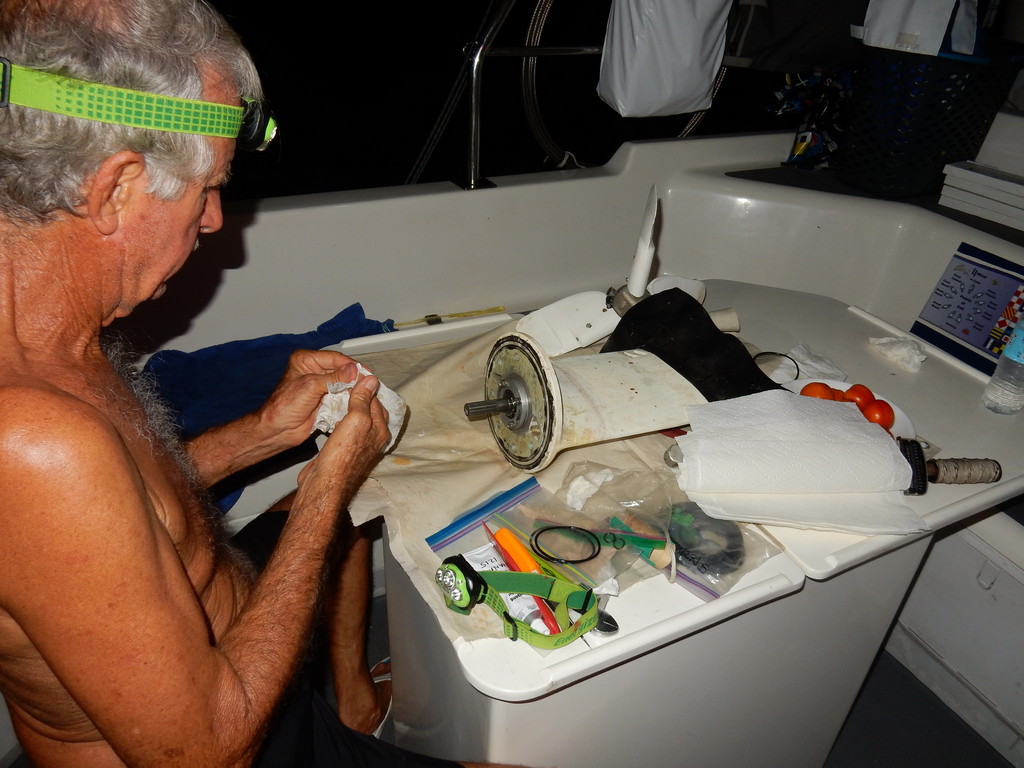
Other things that I can think of off the top of my head that we accomplished... 2 new alternators, new start battery, many small electrical upgrades, rebalanced our LifePO4 batteries, major saildrive maintenance, new propane hoses, new awnings, sail maintenance, liferaft tested and repacked, fire extinguishers serviced, new electric outboard (ePropulsion), new B&G digital radar, new Nav Computer, new flooring in the main cabin (faux teak), boat polishing, rudders straightened (again). We also purchased and learned how to use a Starlink internet terminal, so now we will have real internet when we go offshore.
After agonizing over what kind of bottom paint to use (Chugoku, Jotun, International, CopperCoat), we settled on a new formulation offered by International Marine... International AP. It is an ablative paint formulated for high fouling areas and for slower boats that tend to sit in one place for weeks at a time (ie cruising sailboats). International says we should get 4 years out of it. James arranged for a professional team from International Marine in Singapore to come to Pangkor to apply it, and teach the Pangkor crew how to do it next time. Because we are a test boat, we've agreed to send back periodic updates on how it is doing--they wanted to make sure the paint was applied per International specs.

Beautiful International AP Bottom Paint!
We purchased but have not installed yet, new catamaran nets from MultihullNets (aka Sunrise Yacht Products in St. Pete, FL). Pictured in this link are the nets that came installed on our boat when we bought it. But we have now upgraded to full "offshore" nets, with a strong open weave, more suitable to surviving the open ocean. Pics of those once installed (soon!)
Sherry had fun hanging out with the ladies--morning walks and "water dancing" in the pool for exercise. Dave had fun exchanging technical information with all the guys in the marina. We each took the time to give at least one "class" in the marina "library" to share some of our knowledge and experiences. Sherry on OpenCPN, Dave on LifePO4 batteries. (These presentations can be found at https://svsoggypaws.com/presentations.htm).
We enjoyed having a car for most of the time. One downside of Pangkor is its distance from the main part of town, with, astonishingly, no regular bus system. Grab (the "Uber" of SE Asia) cars are scarce at peak times from the marina. The marina will rent a "beater" for a cheap price by the hour, so you aren't completely stuck. But we opted to rent a car by the month. A nearly new air conditioned small car is only about $250/mo.
The weather since we left 5 days ago has been stinky... low overcast and drizzly with wind out of the north (on our nose, of course). Yesterday it finally cleared up, and we had the tide with us, for once. We were making 8 knots under sail (and current) for 4-5 hours.
We are now in Kuah, Langkawi, Malaysia, getting ready to check out for Thailand. We made a quick stop in Penang to try to get Thai Visas, but the timing didn't work out. We are on a schedule to get checked into Phuket Thailand before Christmas, because some of our friends from last years' rally have organized a big Christmas Day lunch that we want to attend. So waiting over the weekend in Penang wouldn't have worked. We did spend half a day sightseeing (taking the local 50-cent bus into town). Could easily have spent several weeks in Penang exploring.
Likewise, we will only stay a day in Langkawi. Another place worthy of a month or two to explore and savor. But, alas, "You can't see everything."
It was bittersweet. While we are REALLY excited about getting out cruising again, we will really miss everyone, both staff and cruisers, at Pangkor Marina. The Pangkor staff is just fantastic. Led by James Khoo, but supported by Akina, Ruz, Adam, (and several others) in the office, and Shah, Fifi, Fikri, Akmal, (and several others) in the marina and yard, we couldn't have had a better place to spend a year. Yes, A YEAR!
James' monthly (and sometimes more often) BBQ's, where beer, soft drinks, and grilled meat are provided free by the marina, is just one of the thoughtful things that give the marina a very nice community feel. The amenities like a pretty well-stocked marine store (and help sourcing parts they don't stock, from anywhere in SE Asia), free wifi in the air conditioned "library", inexpensive housing across the street from the marina, rental cars by the hour, and a lively Whatsapp group, the marina feels like home.
We did, in all fairness, do two 2 1/2 months visits to the USA, 22 days in Vietnam/Laos, and a long weekend in Cameron Highlands. We got LOTS done that needed doing--most significant being stripping 8 years of bottom paint and getting a new "good for 4 years" bottom job.
Other things that I can think of off the top of my head that we accomplished... 2 new alternators, new start battery, many small electrical upgrades, rebalanced our LifePO4 batteries, major saildrive maintenance, new propane hoses, new awnings, sail maintenance, liferaft tested and repacked, fire extinguishers serviced, new electric outboard (ePropulsion), new B&G digital radar, new Nav Computer, new flooring in the main cabin (faux teak), boat polishing, rudders straightened (again). We also purchased and learned how to use a Starlink internet terminal, so now we will have real internet when we go offshore.
After agonizing over what kind of bottom paint to use (Chugoku, Jotun, International, CopperCoat), we settled on a new formulation offered by International Marine... International AP. It is an ablative paint formulated for high fouling areas and for slower boats that tend to sit in one place for weeks at a time (ie cruising sailboats). International says we should get 4 years out of it. James arranged for a professional team from International Marine in Singapore to come to Pangkor to apply it, and teach the Pangkor crew how to do it next time. Because we are a test boat, we've agreed to send back periodic updates on how it is doing--they wanted to make sure the paint was applied per International specs.
We purchased but have not installed yet, new catamaran nets from MultihullNets (aka Sunrise Yacht Products in St. Pete, FL). Pictured in this link are the nets that came installed on our boat when we bought it. But we have now upgraded to full "offshore" nets, with a strong open weave, more suitable to surviving the open ocean. Pics of those once installed (soon!)
Sherry had fun hanging out with the ladies--morning walks and "water dancing" in the pool for exercise. Dave had fun exchanging technical information with all the guys in the marina. We each took the time to give at least one "class" in the marina "library" to share some of our knowledge and experiences. Sherry on OpenCPN, Dave on LifePO4 batteries. (These presentations can be found at https://svsoggypaws.com/presentations.htm).
We enjoyed having a car for most of the time. One downside of Pangkor is its distance from the main part of town, with, astonishingly, no regular bus system. Grab (the "Uber" of SE Asia) cars are scarce at peak times from the marina. The marina will rent a "beater" for a cheap price by the hour, so you aren't completely stuck. But we opted to rent a car by the month. A nearly new air conditioned small car is only about $250/mo.
The weather since we left 5 days ago has been stinky... low overcast and drizzly with wind out of the north (on our nose, of course). Yesterday it finally cleared up, and we had the tide with us, for once. We were making 8 knots under sail (and current) for 4-5 hours.
We are now in Kuah, Langkawi, Malaysia, getting ready to check out for Thailand. We made a quick stop in Penang to try to get Thai Visas, but the timing didn't work out. We are on a schedule to get checked into Phuket Thailand before Christmas, because some of our friends from last years' rally have organized a big Christmas Day lunch that we want to attend. So waiting over the weekend in Penang wouldn't have worked. We did spend half a day sightseeing (taking the local 50-cent bus into town). Could easily have spent several weeks in Penang exploring.
Likewise, we will only stay a day in Langkawi. Another place worthy of a month or two to explore and savor. But, alas, "You can't see everything."
Saturday, November 30, 2019
Back in the Philippines
Over the last couple of months, we made our way from Papua New Guinea, through NE Indonesia, and back to our marina in Davao, Mindanao, Philippines. Our total mileage for the year is a little over 7,000 nautical miles. It was a long and busy trip.
We've just spent 2 weeks doing maintenance and getting ready to leave the boat for a couple of months. We fly out Monday and will be back in late January/early February to get the boat ready for another foray into Indonesia.
I do plan to try to fill in the highlights of our trip down to the Solomon Islands and Papua New Guinea, so keep checking up on us here!
Tuesday, June 25, 2019
Repairing Your Boat in Exotic Places (Solomon Islands Version)
We are currently in the Solomon Islands. The Solomons are a tiny island country of approximately 900 islands, located off the east coast of Australia. They have had an interesting and varied history, but they are most famous these days for being the site of some major World War II battles (Guadalcanal being the most famous). They achieved independence from Britain in 1976, but still consider Queen Elizabeth II their queen (according to the Wikipedia article).
Like many other developing countries, a lot of the working infrastructure is created and maintained by foreigners. In the Solomons, it is mainly Australians who support the first-world infrastructure that can be found here.
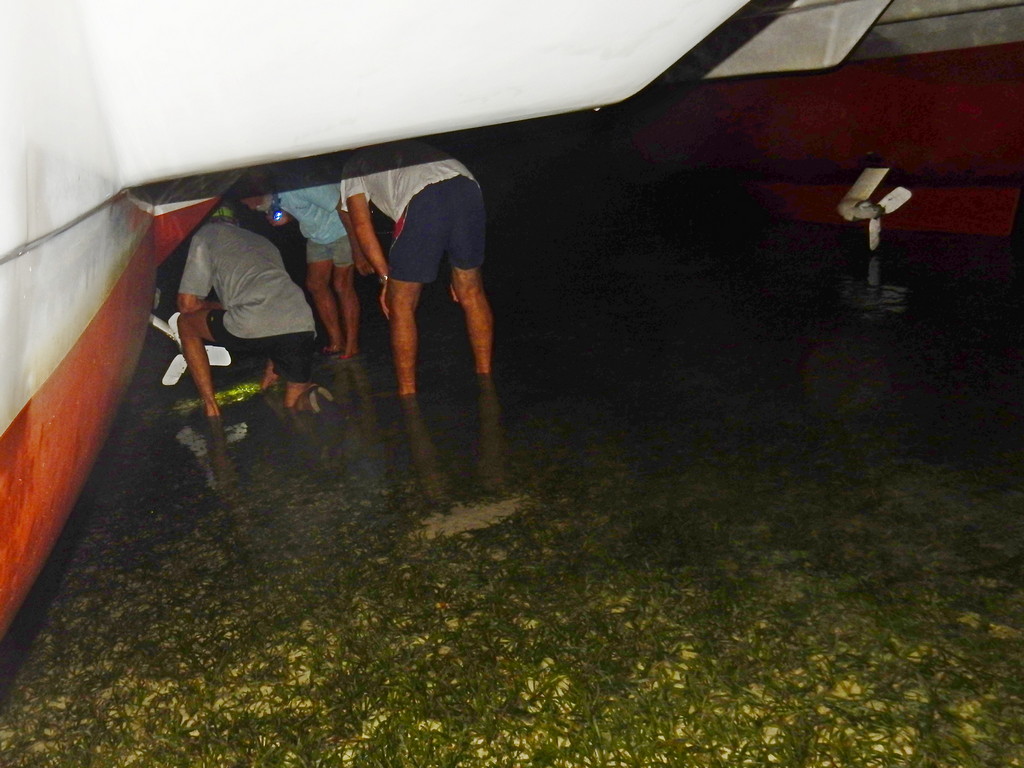
After an encounter with a log in February on our way to PNG (account here and emergency repairs here), and another encounter with a reef also in PNG, we needed to do a little repair work on our bottom. It wasn't urgent--we weren't sinking, but we had a few weeks with no commitments, so Dave decided it might be a good time to get hauled out. It was also about time to change the oil in the saildrives.
We discovered that there are actually 3 haulout facilities in the Solomons (that we know of). We contacted all 3 shipyards and got verbal quotes to haul our 44 foot (14m) catamaran, and have her out for 5 days while we did the repairs we need. The two shipyards in/near Tulagi (Sesape and Avi Avi) are commercial yards. Tulagi is an island that a ~one hour (wet) outboard ride to Honiara, so getting supplies and repair materials is simpler. But neither location is very nice. Tulagi has a bad reputation for theft and boardings (though once up in the shipyard, there are probably guards/dogs).
The 3rd option, Liapari, is semi-commercial, but also a cruiser hangout. Noel and his wife Rosie have a nice area with a pavilion for cruiser happy hours and potlucks. With some forward planning, Noel can get stuff shipped in from Australia, or tell you where (if) you can find it in Gizo or Honiara. They do have some basic cabins on the property, so you can live aboard or in one of their cabins (at extra cost, of course). Noel runs a shuttle to Gizo at least once a week.
Liapari has 2 slipways, one set up for monohulls and a new one that Noel has recently commissioned for wider/bigger vessels up to 200 tons. The carriage on the big haulout is 24 feet wide, but there is a frame that can sit on the carriage and go under the bridge deck of a catamaran, to haul cats wider than 24 feet. Power is available (240v) and water is nearby, out of a rain-fed tank (we used buckets as we didn’t need much, but you could rig some kind of a hose if necessary).
Noel also has space at his dock for a few boats, and also a few moorings (lots of anchoring space too). A number of cruisers have left boats in the water at Noel's dock for several months at a time. Liapari is above 8 degrees S, so theoretically out of the cyclone belt. The harbor is completely enclosed by 70% land and 30% reef, and would be fine to weather anything but a direct hit from a major cyclone (unlikely given its location). Noel provides a water taxi once or twice a week so cruisers can get needed supplies from nearby Gizo. Gizo also has an airport link that, via Honiara, can get you to Brisbane and international airlines.
Noel has an extensive workshop and can do fabrication and welding, as well as mechanical repairs.
If you are in need of a haulout in the Solomons, we can recommend Liapari. Our Solomon Islands Compendium, a free downloadable PDF found on our Files Page, includes pricing and contact details for all 3 shipyards. SW Pacific Compendiums
Because we opted to just sit on our keels, rather than on Noel's strong frame that would allow lifting under the bridge deck, we stayed at a minor tilt during our haulout. But if you haul out using Noel's frame, it is angled a little bit so that you end up with the boat level. Noel has, or can build, whatever structure you need to make sure your boat sits on it's strongest part for the haulout.
Tuesday, March 5, 2019
Rudder Repair in Kavieng, PNG
Feb 19-Mar 4 Kavieng, Papua New Guinea
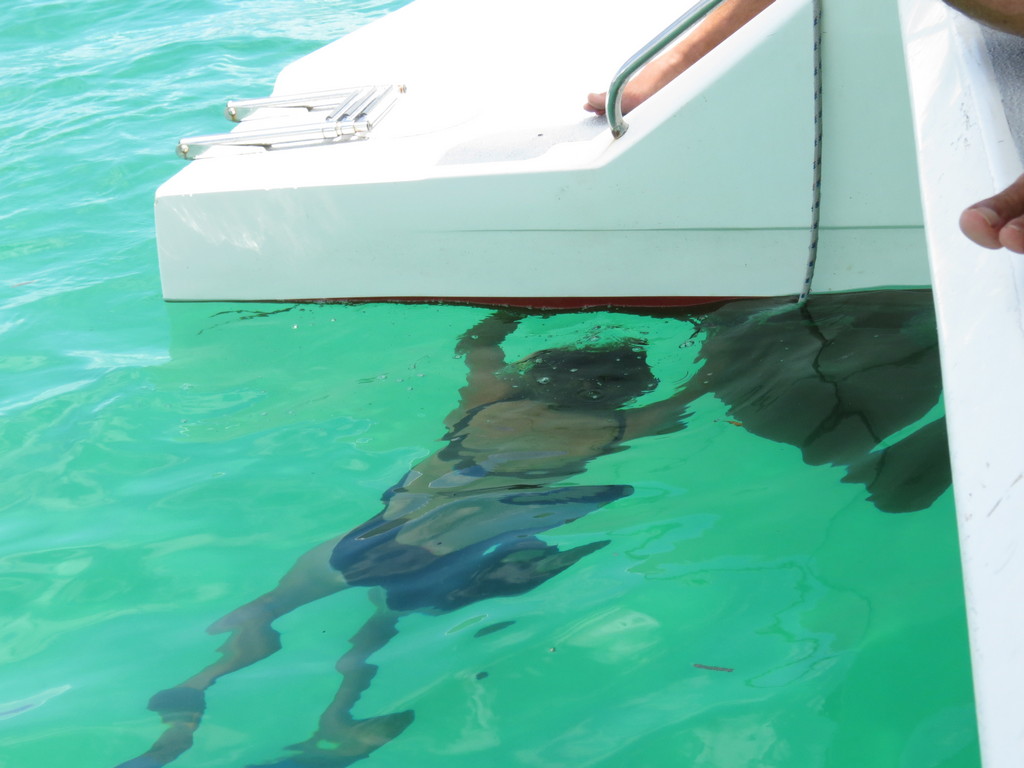
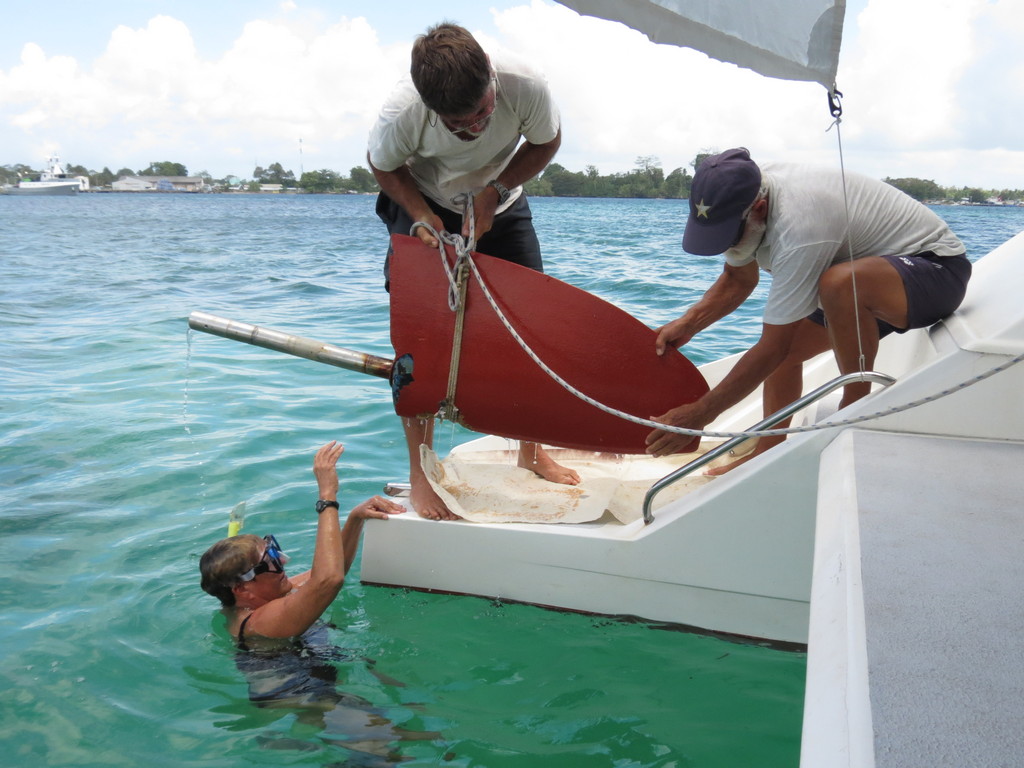
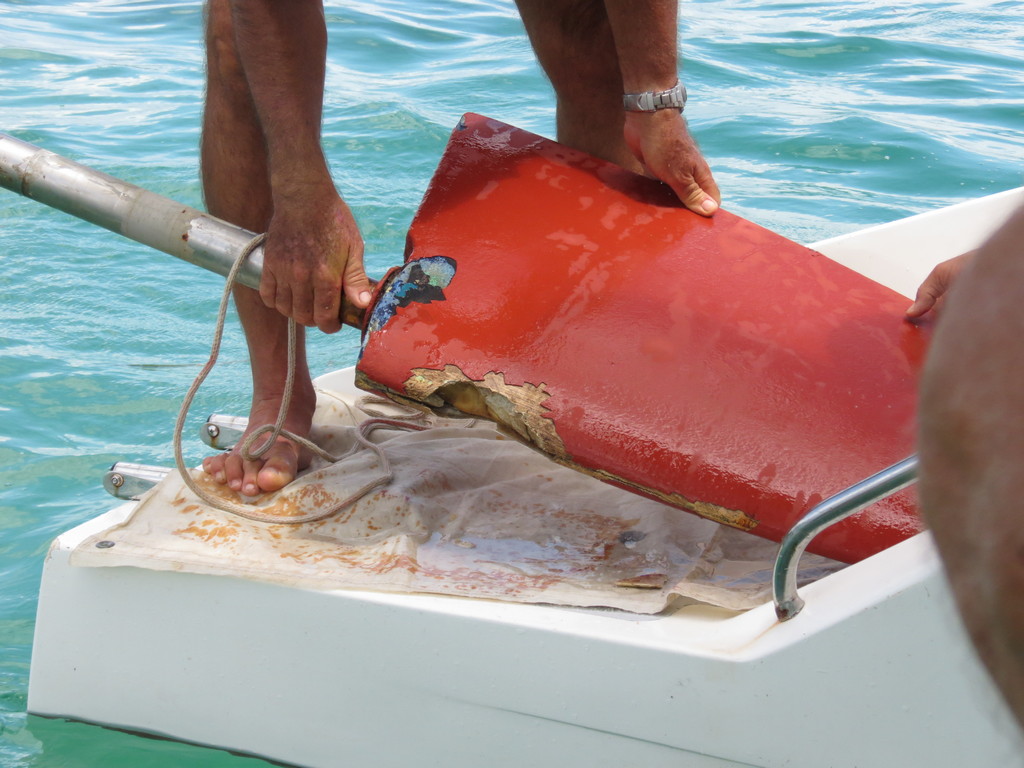
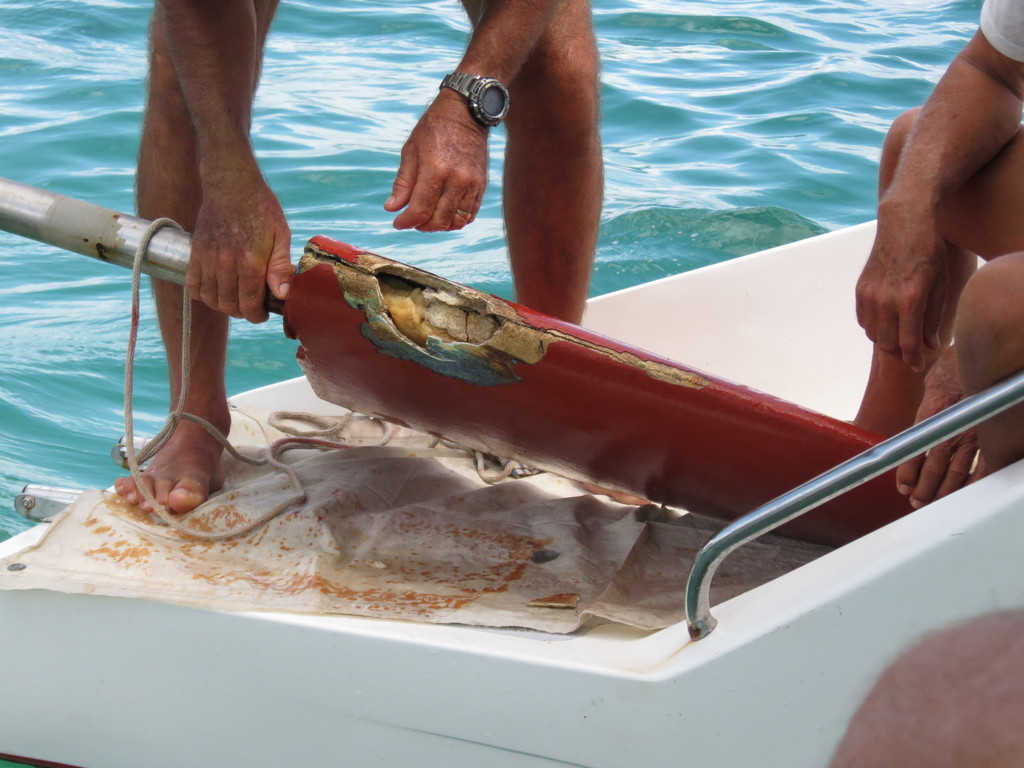
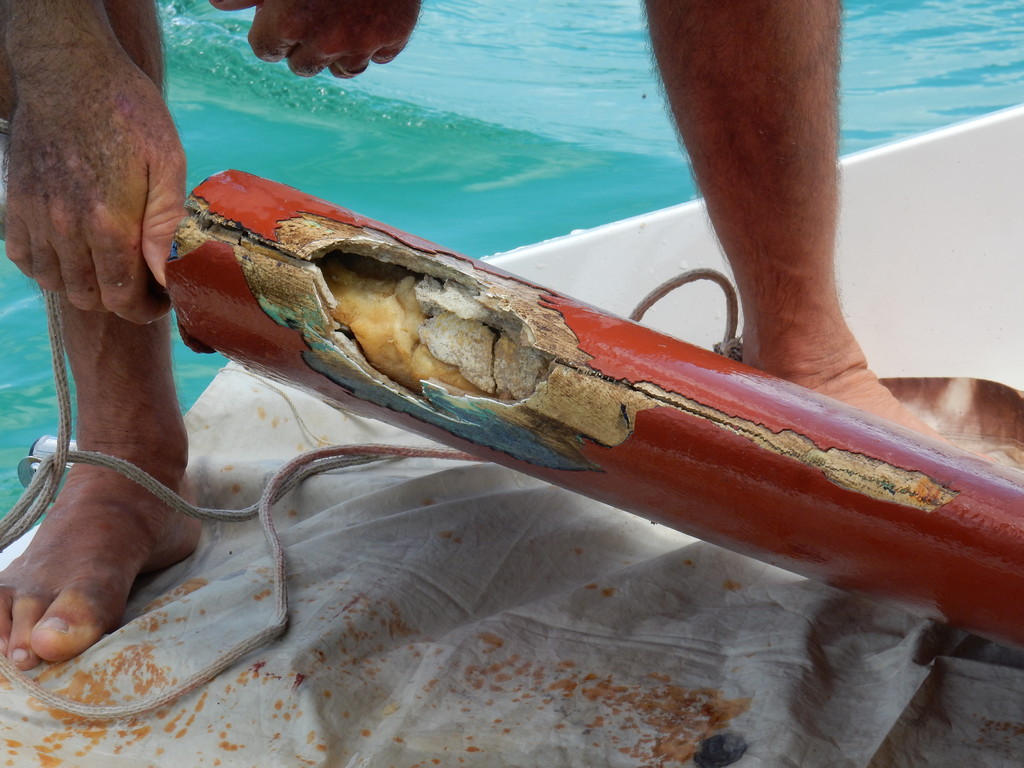
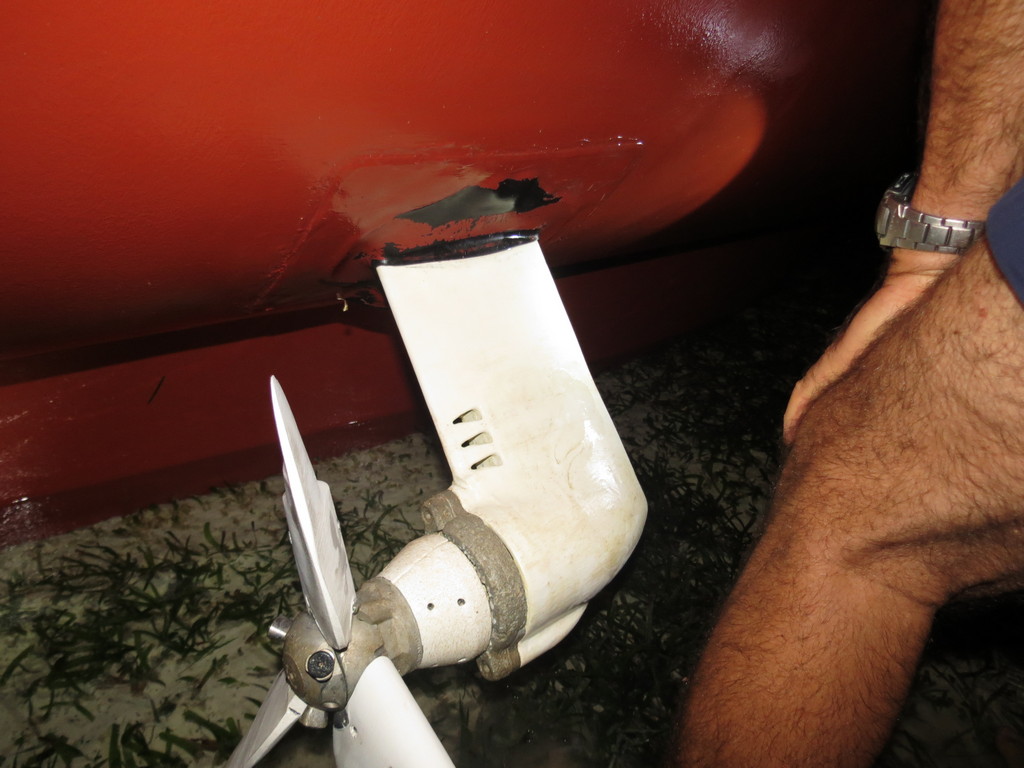
One of the most urgent things we needed to do once we reached Kavieng, PNG on Feb 19, was figure out how to repair our port rudder, which had a soft-ball sized dent mashed into the leading edge by a log.

The Log We Hit Enroute to the Ninigos in January
Dave is great with mechanical things, but considers himself a little weak when it comes to fiberglassing. So we enlisted Jon Hacking from our buddy boat Ocelot to help him do the repairs. Fortunately, between the 4 boats, we managed to scrounge up the necessary repair materials.
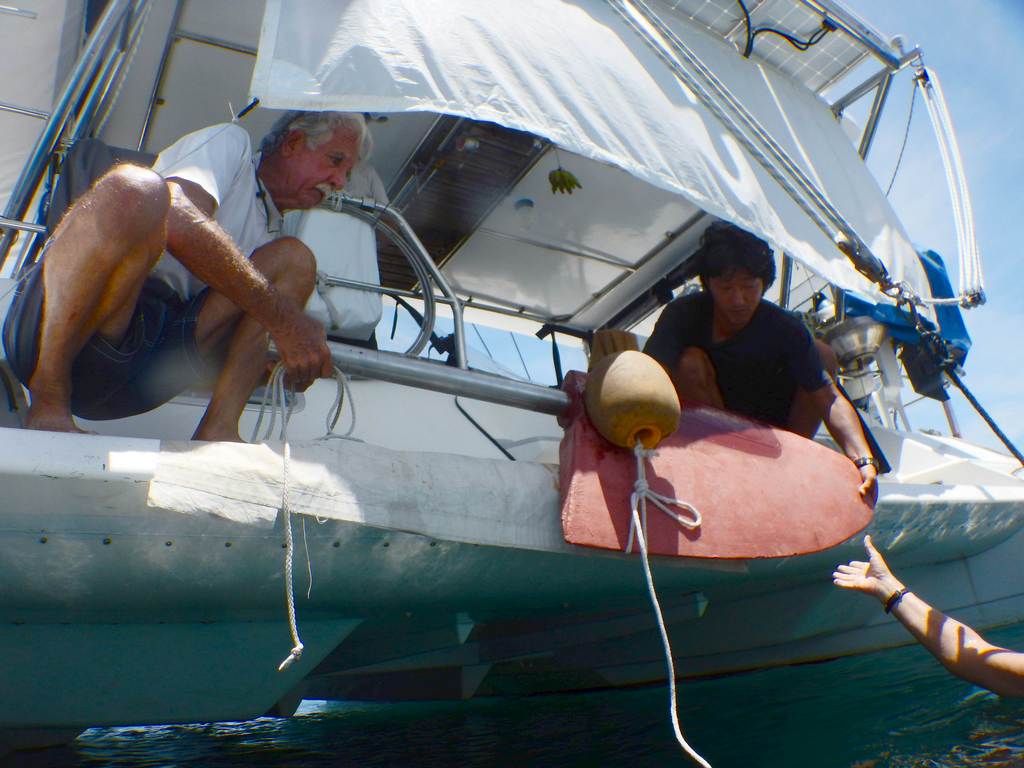
The first step was to get the rudder out of the water. This we opted to do by dropping the rudder (carefully) while in the water. We consulted with the St. Francis Owners Group for advice. One person said the rudder would float, another said it would sink. So we got Soggy Paws into as shallow a water as we could manage (not very shallow where we were anchored). We also tied a line around the rudder, so someone on board could hold onto it. Then I got in the water, Dave loosened the bolts, and down she came.

Disconnecting the Rudder Arm Prior to Dropping the Rudder

Loosening the Bolts Holding the Rudder
Fortunately the shaft wasn't bent (which would have jammed the rudder stock from coming down the tube). A little wiggling back and forth on my part, and the rudder dropped a couple of inches. I took another breath, pulled harder, and the rudder came right out.

Sherry Pulling Rudder

Rudder is Out!
The rudder didn't float, but it wasn't too heavy for me to hold up in the water, and we had the security line on it.

Our Ding from a Big Log


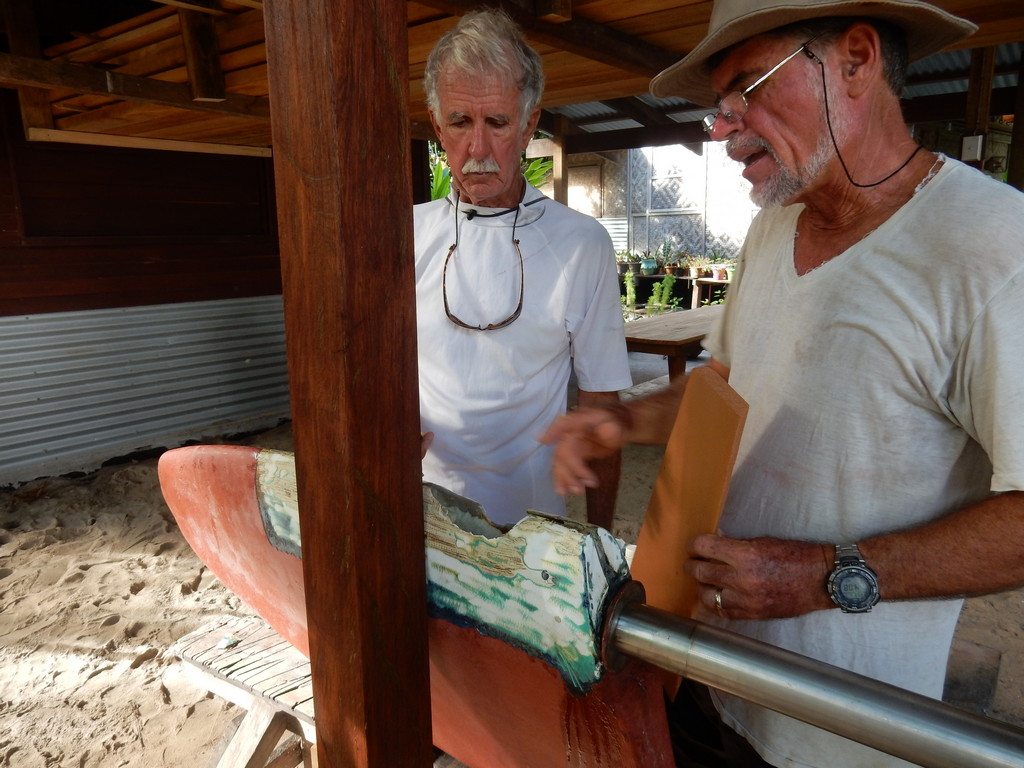
The ding looked pretty bad. Dave and Jon took the rudder ashore to a small covered shed that Nusa Island Resort kindly let us use. The first step was to grind out the ding, rinse it well in fresh water, and let it dry for a few days.
Once it was dry, Jon and Dave started building the ding back up--first with some foam, then with putty and fiberglass/epoxy. We had a little bit of old bottom paint to finish it up. The repair was kind of crude, but it fixed the hole, and we're back in business.

Dave and Jon Working on the Rudder

I was worried about getting the rudder stock up into the tube, but it was no big deal. We had everyone from our little flotilla helping out in one way or another.

Putting the Rudder Back In

(follow up note: When we hauled out in July 2019 to do some other bottom repairs, the rudder looked fine, though the old bottom paint wasn't doing much, so we repainted the rudder)
One of the most urgent things we needed to do once we reached Kavieng, PNG on Feb 19, was figure out how to repair our port rudder, which had a soft-ball sized dent mashed into the leading edge by a log.
Dave is great with mechanical things, but considers himself a little weak when it comes to fiberglassing. So we enlisted Jon Hacking from our buddy boat Ocelot to help him do the repairs. Fortunately, between the 4 boats, we managed to scrounge up the necessary repair materials.
The first step was to get the rudder out of the water. This we opted to do by dropping the rudder (carefully) while in the water. We consulted with the St. Francis Owners Group for advice. One person said the rudder would float, another said it would sink. So we got Soggy Paws into as shallow a water as we could manage (not very shallow where we were anchored). We also tied a line around the rudder, so someone on board could hold onto it. Then I got in the water, Dave loosened the bolts, and down she came.

Fortunately the shaft wasn't bent (which would have jammed the rudder stock from coming down the tube). A little wiggling back and forth on my part, and the rudder dropped a couple of inches. I took another breath, pulled harder, and the rudder came right out.
The rudder didn't float, but it wasn't too heavy for me to hold up in the water, and we had the security line on it.
The ding looked pretty bad. Dave and Jon took the rudder ashore to a small covered shed that Nusa Island Resort kindly let us use. The first step was to grind out the ding, rinse it well in fresh water, and let it dry for a few days.
Once it was dry, Jon and Dave started building the ding back up--first with some foam, then with putty and fiberglass/epoxy. We had a little bit of old bottom paint to finish it up. The repair was kind of crude, but it fixed the hole, and we're back in business.

I was worried about getting the rudder stock up into the tube, but it was no big deal. We had everyone from our little flotilla helping out in one way or another.

(follow up note: When we hauled out in July 2019 to do some other bottom repairs, the rudder looked fine, though the old bottom paint wasn't doing much, so we repainted the rudder)
Friday, January 25, 2019
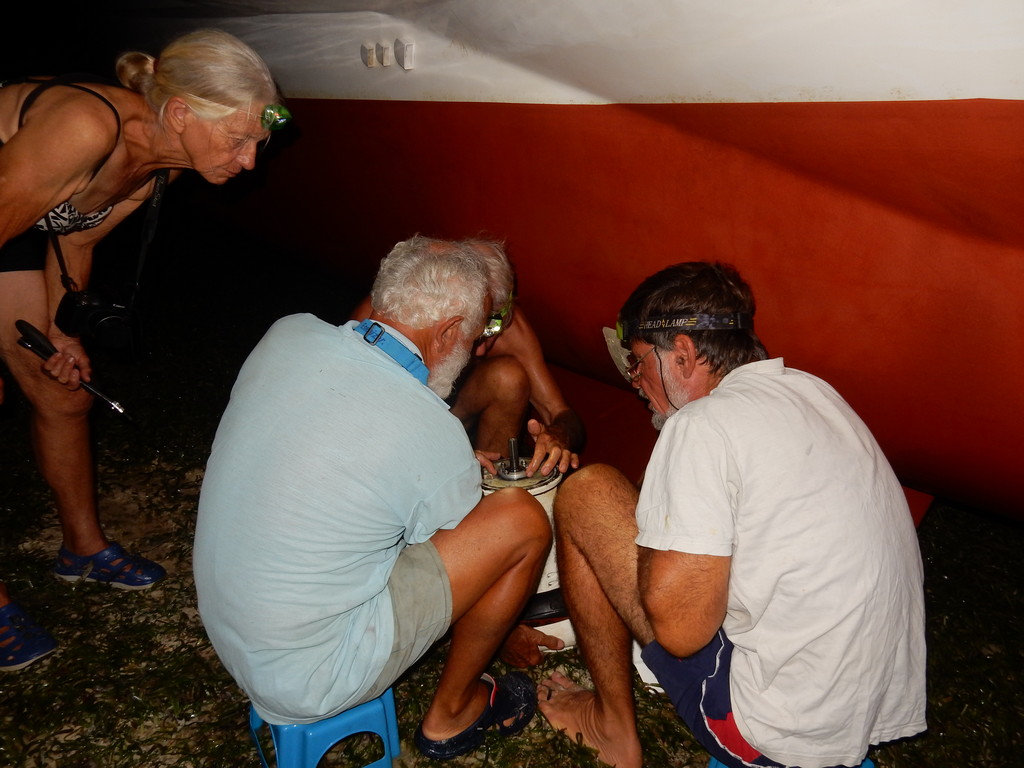
Repairing Leaky Saildrives
Jan 22-24, Padiado Islands, East of Biak, Irian Jaya, Indonesia - Another episode of repairing your boat in exotic places!
While we were hauled out in Samal, Dave had taken the saildrive legs out for some maintenance.
Once we got underway, Dave noticed that the port saildrive gear oil was looking kind of "milky". This is an indication that salt water has gotten into the gear oil. Not good. Since he had just re-done the seals in the lower unit, he was scratching his head about the cause. He thought maybe he had pinched an o-ring when he was putting it back together. The starboard saildrive looked better, but still showed a little milkiness. He did the best he could on the port drive to suck out all the bad oil and replace with good oil. A few days later it was looking very milky again.
So we continued on, using only the starboard engine. This is OK, we can make 5 knots under motor with no adverse winds, and maneuvering is a little tricky, but we managed. It required a haulout to look at the problem and try to fix it, and we knew that there weren't any convenient haulout facilities available in eastern Indonesia. So we started looking for a place to haul out on the beach. At first we thought about that perfect beach in Batanta (near Sorong) where we'd changed the zincs in July or August 2016 (see pictures by finding our blog entry about that "haulout").
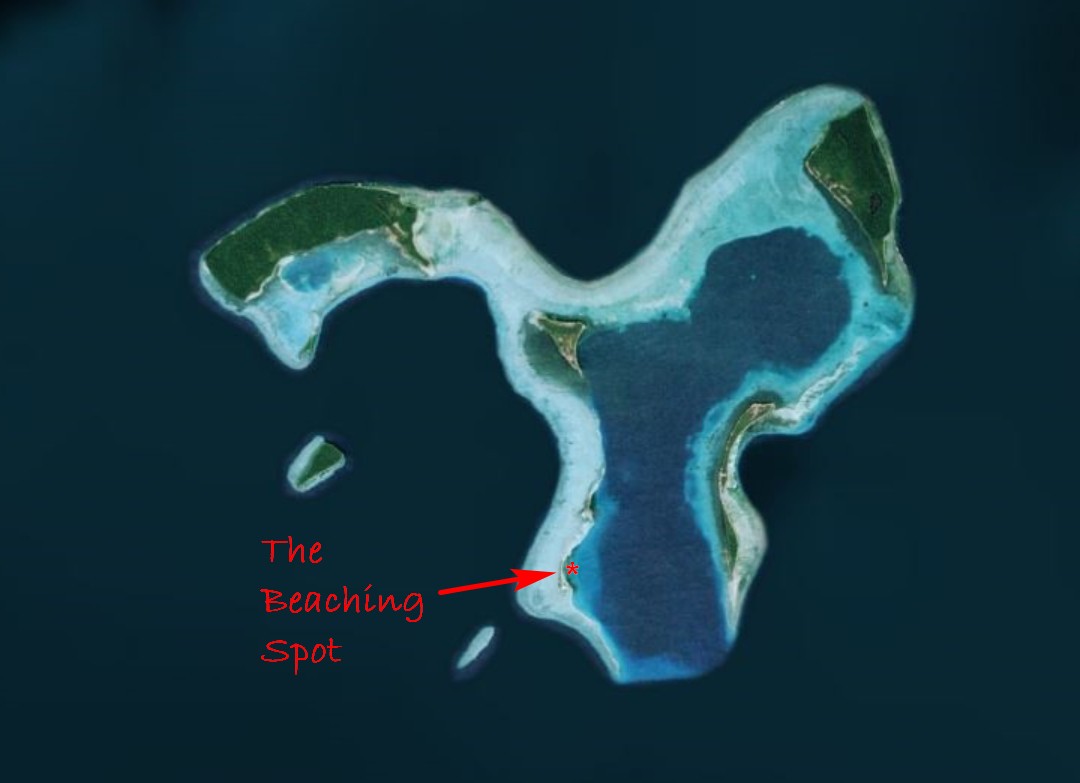
But the tide cycle wasn't right--the big low tide was in the middle of the night, and all our buddy boats were just about to head east from Sorong. So we started looking for likely spots further east, for a few weeks hence where we might have a good daytime low tide. We found a lagoon 20 miles east of Biak that looked possible. There were a lot of beaches, it was protected from SW-N-SE, and the time we would be there coincided with the next bout of high tides. But... again the lowest tide, where we'd have plenty of time to work on the saildrives, was in the middle of the night. But as we proceeded further east beyond that, the tidal rhythms changed, and the tides are not as big. So it had to be Jan 23 or 24, or forget it til we found a proper haulout facility somewhere in Papua New Guinea or the Solomon Islands.

The Selected Beaching Spot
So that's why our time in Biak was so rushed--we needed to get out to the selected spot on the 22nd and scope things out--look for a place we could get into at high tide that would be a level spot at low tide. Once we got to Mios Weundi (Paidado Islands) late in the afternoon of Tuesday the 22nd, we were surprised to find that our haulout beach was occupied with some fishing families, complete with kids, dogs, chickens, etc. Hmmm...
The next morning we went in in the dinghy at high tide to check depths and just look at the spot. It turned out that our perfect beach (selected via GoogleEarth) was inaccessible because there was a ridge of sand blocking our access, even at high tide. Dinghying around in the curve of the island, we found another spot that looked good. The only drawback was that it was covered in a fine grass. Not as nice a work platform as nice sand, but in actuality, the grass was better because it held the sand together, and made a nice firm surface.
We met who appeared to be the headman. He spoke no English and we no Indonesian. But with signs Dave attempted to tell him that we planned to beach the boat there at 6pm. I am not sure he understood, but we got "bagus" (good) and an OK sign. We didn't--but should have--brought a gift in for him--a few cigarettes, a small bag of rice, something. At around 5pm, our buddy boats arrived from Biak (thank god, as we couldn't have managed without their help). Jon on Ocelot and Chris and Sue from Indigo II volunteered to (a) help us get the boat beached at sunset and (b) come in at midnight and help with the work on the saildrives. Both boats are catamarans and were keen to see how we did the project.
It was no big deal getting beached. Though high tide was not til around 8pm, we went in just before dark, and made sure we got secured in place when the tide was a little lower than the high the next morning. If we couldn't get ourselves off in the morning, we'd be stuck for about 2 weeks til the tides got higher again! We drove in slowly to the selected part of the beach, and when we stopped, I jumped off the back with the Fortress anchor, and walked it out 100 feet to secure our stern. Dave dropped the 100 lb Spade off the bow and Jon and Chris muscled it out ahead of us about 100 ft. Then we tightened it up and had happy hour.

Beached!
As soon as we got set, the wind uncharacteristically switched to the north (from WNW). A squall was passing south of us, and we were not very protected from the north. I worried for an hour or two but it all amounted to nothing. As the tide rose to its peak, a slight swell started moving us around, jerking us back and forth like a yo-yo between anchors. It seemed we'd never settle back down in the sand. But of course we did. (Dave took a nap, but I couldn't as I was fretting about the weather, the jerking, etc).

Finally Firmly Aground
Finally about 10pm we were firmly on the bottom, and by midnight, we could see wet seagrass under the boat. Before all the water went away, Dave went in our dinghy and collected our volunteer helpers, and they couldn't get the dinghy all the way back to the boat, so he tied the painter off to the stern anchor line. And they set to work.

Help Arriving
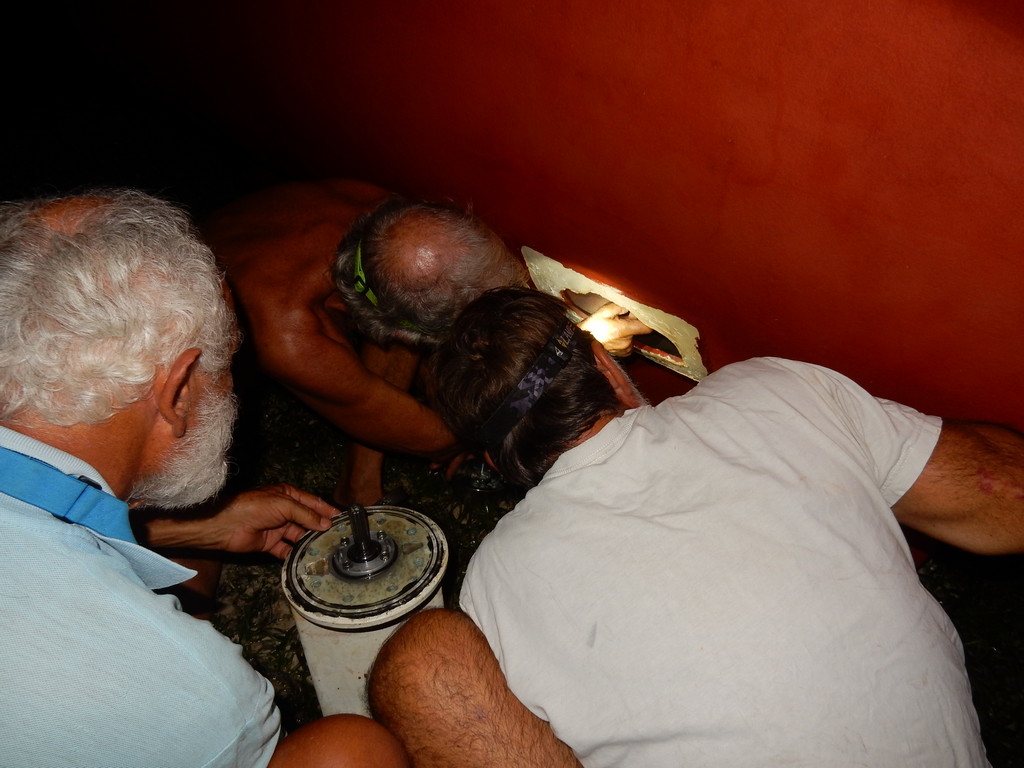
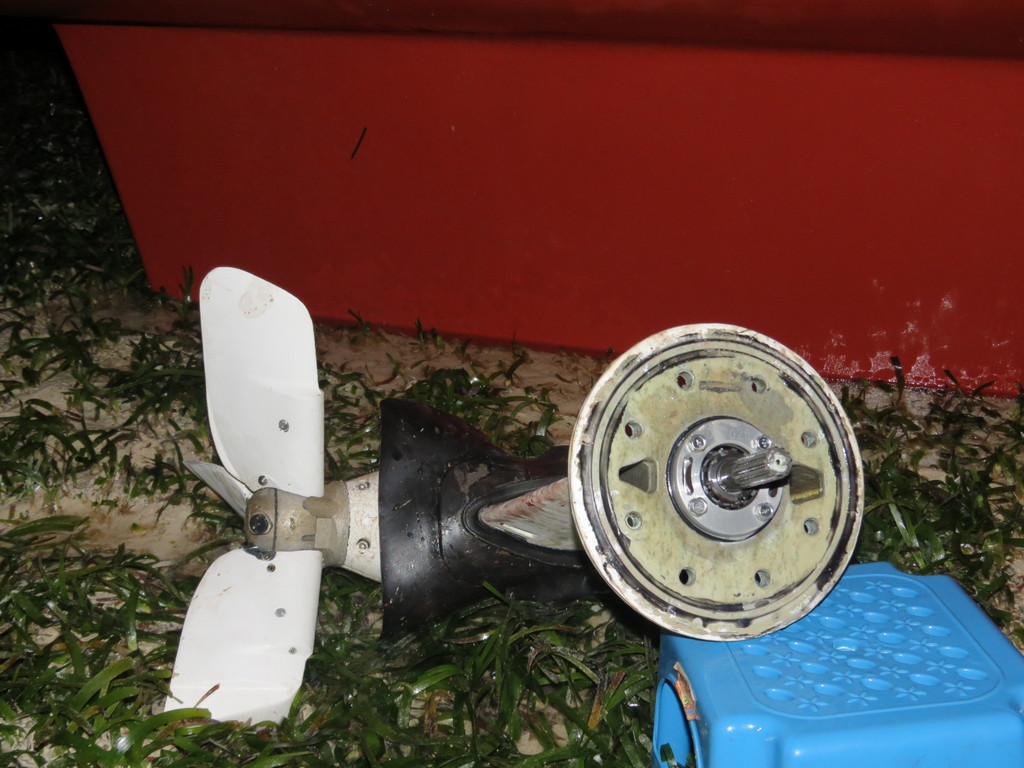
I was designated to stay on board to hand things down, and take things up so they could be worked on. Dave, Jon, Chris, and Liz were working on first the port saildrive and then the starboard. They drained the gear oil out and then took the lower units off.

The Crew Assesses the Situation

One of our Saildrives In Situ
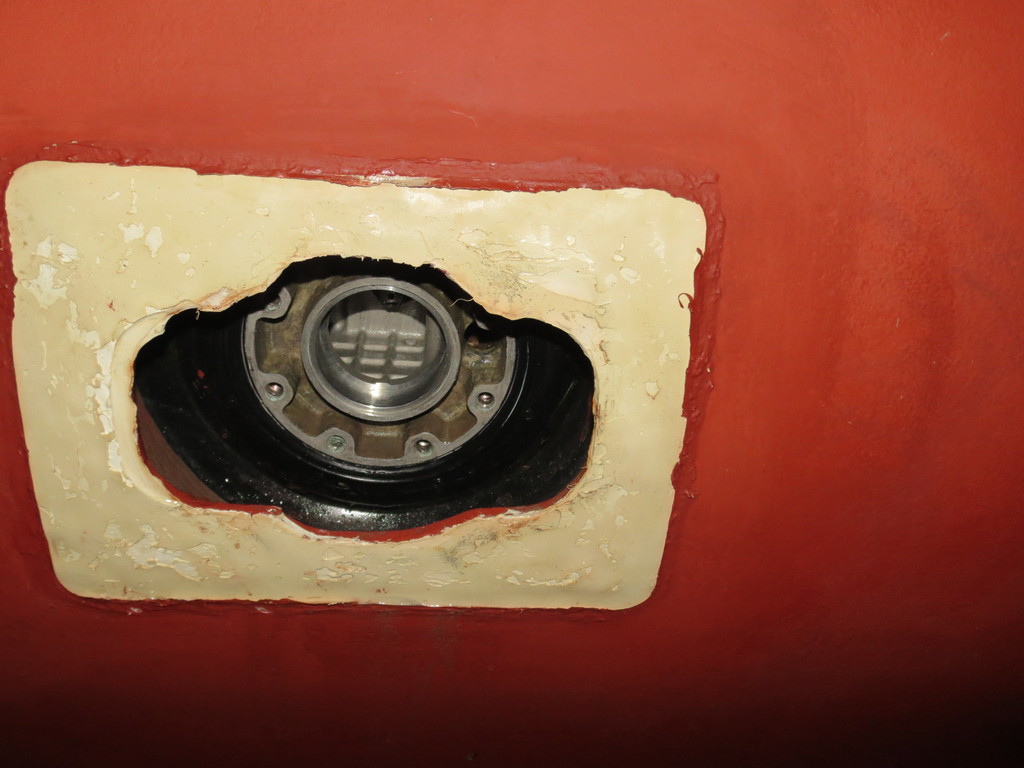
Note Rubber Boot at Top of the Drive--glue isn't holding well. That rubber boot needs to be removed and re-glued after re-assembly.

Dave Removes the Gear Oil Plug

Ooooh! Note the Milky Oil

Putting the Waste Oil in a Disposal Container
After the oil was drained, they flushed each saildrive with a little bit of diesel, to make sure there was no salt water left in the drive.
Then they took the first drive apart, and Dave carefully inspected the situation, to try to determine why it was leaking.

Disassembling the Saildrive (Don't Lose Any Parts!)

Checking O-Rings and Seals

Checking O-Rings and Seals

The Bottom End of the Yanmar Engine Where the Saildrive Mates

One Saildrive Removed
The seals and o-rings looked OK, but Jon said the bolts on the port drive were very loose. He suspected that was the cause of our leak.

Dave Carefully Cleans and Preps the Drive for Re-Installing
Dave brought each lower unit up into the cockpit so he could look at the seals and o-rings and make sure the mating surface was clean. I spent some time cleaning all the bolts in diesel. Meanwhile the tide went out and out. Eventually we had a grassy spot behind out boat going out nearly 200 feet.
Dave couldn't find anything wrong looking with either the port or starboard lower units, so we had to conclude (hope) that the problem was that the bolts either didn't get tightened properly, or hadn't stayed tight. This time, instead of using a grease on the bolts, Dave used a threadlock, and with everyone looking on, torqued each of the bolts.

Chris Cleans the area where the Saildrive Boots Get Glued On
The final step was putting the rubber "boots" back around the saildrives. These are flat oval-shaped pieces of rubber that are slit on one side to fit around the saildrive. They are supposed to be glued onto the hull over the opening that the saildrive protrudes through. This is the 3rd iteration for us trying to get these boots on. The first time, we had someone else do it, and they stuck pretty well. Last year, we used truck mud flaps for the boot material, and Sikaflex for the "glue". They didn't hold very well. This time, Dave had bought proper Yanmar boots, and they were a soft flexible rubber. Again he used Sikaflex. And they were already starting to come off. So Chris on Indigo offered that he had had success using Super Glue, and offered a handful of small tubes of Super Glue. They prepped the surfaces of the rubber and the hull as best they could under the conditions, but really struggled getting the boot to stick. The soft rubber wasn't very conducive to getting stuck well, and the boots were a little warped already. They ran out of Super Glue trying to get the first one done, so we used Sikaflex again for the other drive, as the tide was starting to come back in.
Meanwhile as we'd been working, a big black storm built to the SE of us, and started to move in and blot out the moon. We could hear the wind howling in the trees ashore, and I was again worrying about being exposed and the weather. But when I switched on our wind instrument, we had only about 5 knots. Fortunately, we were well protected from this storm.
While Jon and Chris and Liz were working on the boots, Dave and I were filling the saildrives with gear oil. By 0430, everything was done, and there was nothing left to do but wait for the tide (and hope the wind died out). The last thing our weary helpers did was drag the heavy bow anchor back close enough where we could lift it easily when the tide came in.
When it was time to take our friends back to their boats, the tide was still out enough that he dinghy was still high and dry. But the slippery grass made it easy to drag the dinghy out to the water, still about 50 ft away. By the time he came back to Soggy Paws, the water was up enough that he could drag the dinghy close enough to secure it to the boat.
AT 0730, we felt the first bump, meaning the tide was starting to lift us off the sand/grass. About 0810 we were floating enough to kedge ourselves outward using the stern anchor, and by 0820 we were anchored back next to the other 2 boats. The Fortress was so dug in that we put a buoy on it and left it to retrieve with the dinghy. It took Dave a good 10 minutes of standing there and wiggling and digging around the flukes to get that anchor free.
We all planned to stay there for the day and rest up, get ready for passage-making, and wait for Berzerker to arrive from Biak. But about 1030, a boatload of locals, including the head man we had "talked" to, came by our boats asking for money. We felt that we had used their beach, and didn't mind giving them 100,000 Rp ($7 USD). The other two boats were reluctant, because once the locals receive money from one boat, they are going to expect it from everyone else who stops there. Reluctantly one boat gave them 20,000 Rp, and the 3rd boat refused, saying it's not customary to charge anchoring fees in Indonesia. The local men were happy with our 100K, but not happy with the other two boats, and the vibe wasn't good. So we collectively decided to pick up anchor and move to another anchorage, another atoll, 13 miles to the west.
Though we were all tired, we had a fairly pleasant sail and managed to find a good anchorage in NW conditions at Manggawandi. We were pleased to find that both saildrives seemed to be working OK, and no milky stuff in the gear oil. We had used both engines at idle speed to motor off the beach and out to the anchorage, and started out with just the port engine.
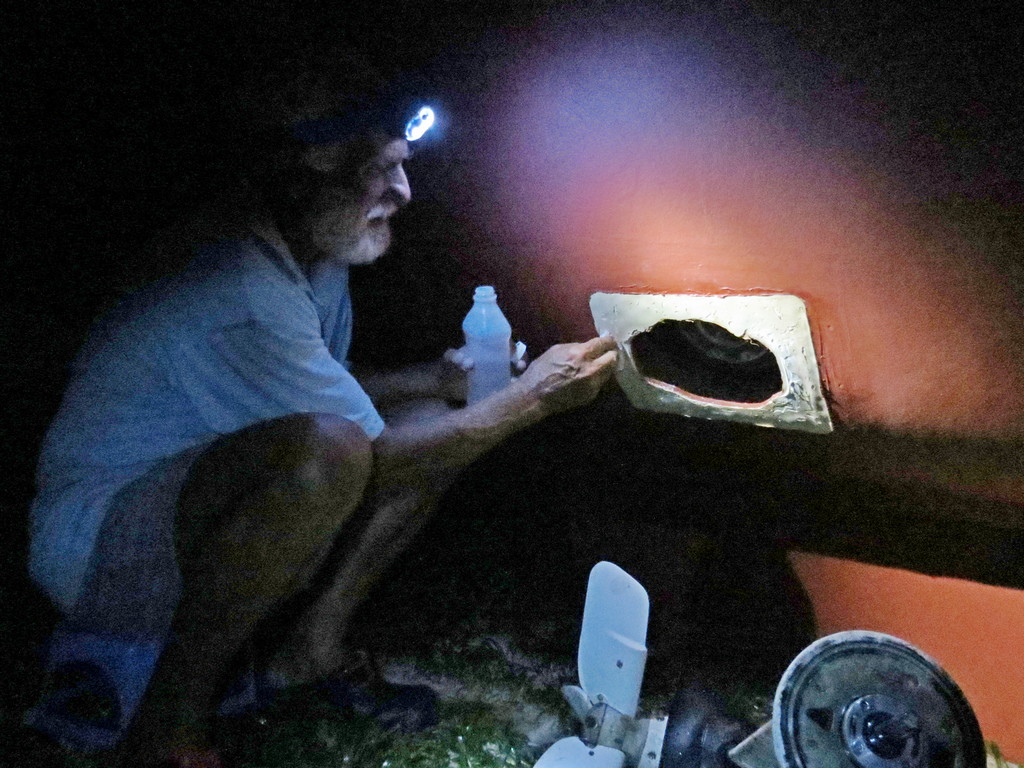
Once we started the starboard engine to motor in to our new anchorage, it shutdown on an overtemp after running at speed for about 10 minutes. Obviously we had a cooling water issue in that drive, from running the drives while we were hauled out (to circulate clean diesel in the lower unit, prior to refilling with gear oil, to flush the salt water out). We switched to the port engine and carried on in to the anchorage. Dave eventually spent half a day getting the starboard saildrive cooling water circulating again.
Manggawandi is a very large bay with a nice sand area in about 30 ft. One friendly person stopped by in a canoe and told us we were welcome, and did not ask for money. We could see and hear the surf breaking out on the reef, but the anchoring area was pretty good. 01-17.636S / 136-36.364 E
Berserker finally sailed in at sunset. We had a short happy hour on Indigo, and planned leaving for the Ninigos in the morning.
-----
At 1/28/2019 2:15 AM (utc) our position was 01°13.32'S 144°17.96'E
While we were hauled out in Samal, Dave had taken the saildrive legs out for some maintenance.
Once we got underway, Dave noticed that the port saildrive gear oil was looking kind of "milky". This is an indication that salt water has gotten into the gear oil. Not good. Since he had just re-done the seals in the lower unit, he was scratching his head about the cause. He thought maybe he had pinched an o-ring when he was putting it back together. The starboard saildrive looked better, but still showed a little milkiness. He did the best he could on the port drive to suck out all the bad oil and replace with good oil. A few days later it was looking very milky again.
So we continued on, using only the starboard engine. This is OK, we can make 5 knots under motor with no adverse winds, and maneuvering is a little tricky, but we managed. It required a haulout to look at the problem and try to fix it, and we knew that there weren't any convenient haulout facilities available in eastern Indonesia. So we started looking for a place to haul out on the beach. At first we thought about that perfect beach in Batanta (near Sorong) where we'd changed the zincs in July or August 2016 (see pictures by finding our blog entry about that "haulout").
But the tide cycle wasn't right--the big low tide was in the middle of the night, and all our buddy boats were just about to head east from Sorong. So we started looking for likely spots further east, for a few weeks hence where we might have a good daytime low tide. We found a lagoon 20 miles east of Biak that looked possible. There were a lot of beaches, it was protected from SW-N-SE, and the time we would be there coincided with the next bout of high tides. But... again the lowest tide, where we'd have plenty of time to work on the saildrives, was in the middle of the night. But as we proceeded further east beyond that, the tidal rhythms changed, and the tides are not as big. So it had to be Jan 23 or 24, or forget it til we found a proper haulout facility somewhere in Papua New Guinea or the Solomon Islands.
So that's why our time in Biak was so rushed--we needed to get out to the selected spot on the 22nd and scope things out--look for a place we could get into at high tide that would be a level spot at low tide. Once we got to Mios Weundi (Paidado Islands) late in the afternoon of Tuesday the 22nd, we were surprised to find that our haulout beach was occupied with some fishing families, complete with kids, dogs, chickens, etc. Hmmm...
The next morning we went in in the dinghy at high tide to check depths and just look at the spot. It turned out that our perfect beach (selected via GoogleEarth) was inaccessible because there was a ridge of sand blocking our access, even at high tide. Dinghying around in the curve of the island, we found another spot that looked good. The only drawback was that it was covered in a fine grass. Not as nice a work platform as nice sand, but in actuality, the grass was better because it held the sand together, and made a nice firm surface.
We met who appeared to be the headman. He spoke no English and we no Indonesian. But with signs Dave attempted to tell him that we planned to beach the boat there at 6pm. I am not sure he understood, but we got "bagus" (good) and an OK sign. We didn't--but should have--brought a gift in for him--a few cigarettes, a small bag of rice, something. At around 5pm, our buddy boats arrived from Biak (thank god, as we couldn't have managed without their help). Jon on Ocelot and Chris and Sue from Indigo II volunteered to (a) help us get the boat beached at sunset and (b) come in at midnight and help with the work on the saildrives. Both boats are catamarans and were keen to see how we did the project.
It was no big deal getting beached. Though high tide was not til around 8pm, we went in just before dark, and made sure we got secured in place when the tide was a little lower than the high the next morning. If we couldn't get ourselves off in the morning, we'd be stuck for about 2 weeks til the tides got higher again! We drove in slowly to the selected part of the beach, and when we stopped, I jumped off the back with the Fortress anchor, and walked it out 100 feet to secure our stern. Dave dropped the 100 lb Spade off the bow and Jon and Chris muscled it out ahead of us about 100 ft. Then we tightened it up and had happy hour.
As soon as we got set, the wind uncharacteristically switched to the north (from WNW). A squall was passing south of us, and we were not very protected from the north. I worried for an hour or two but it all amounted to nothing. As the tide rose to its peak, a slight swell started moving us around, jerking us back and forth like a yo-yo between anchors. It seemed we'd never settle back down in the sand. But of course we did. (Dave took a nap, but I couldn't as I was fretting about the weather, the jerking, etc).
Finally about 10pm we were firmly on the bottom, and by midnight, we could see wet seagrass under the boat. Before all the water went away, Dave went in our dinghy and collected our volunteer helpers, and they couldn't get the dinghy all the way back to the boat, so he tied the painter off to the stern anchor line. And they set to work.

I was designated to stay on board to hand things down, and take things up so they could be worked on. Dave, Jon, Chris, and Liz were working on first the port saildrive and then the starboard. They drained the gear oil out and then took the lower units off.
Note Rubber Boot at Top of the Drive--glue isn't holding well. That rubber boot needs to be removed and re-glued after re-assembly.
After the oil was drained, they flushed each saildrive with a little bit of diesel, to make sure there was no salt water left in the drive.
Then they took the first drive apart, and Dave carefully inspected the situation, to try to determine why it was leaking.
The seals and o-rings looked OK, but Jon said the bolts on the port drive were very loose. He suspected that was the cause of our leak.
Dave brought each lower unit up into the cockpit so he could look at the seals and o-rings and make sure the mating surface was clean. I spent some time cleaning all the bolts in diesel. Meanwhile the tide went out and out. Eventually we had a grassy spot behind out boat going out nearly 200 feet.
Dave couldn't find anything wrong looking with either the port or starboard lower units, so we had to conclude (hope) that the problem was that the bolts either didn't get tightened properly, or hadn't stayed tight. This time, instead of using a grease on the bolts, Dave used a threadlock, and with everyone looking on, torqued each of the bolts.
The final step was putting the rubber "boots" back around the saildrives. These are flat oval-shaped pieces of rubber that are slit on one side to fit around the saildrive. They are supposed to be glued onto the hull over the opening that the saildrive protrudes through. This is the 3rd iteration for us trying to get these boots on. The first time, we had someone else do it, and they stuck pretty well. Last year, we used truck mud flaps for the boot material, and Sikaflex for the "glue". They didn't hold very well. This time, Dave had bought proper Yanmar boots, and they were a soft flexible rubber. Again he used Sikaflex. And they were already starting to come off. So Chris on Indigo offered that he had had success using Super Glue, and offered a handful of small tubes of Super Glue. They prepped the surfaces of the rubber and the hull as best they could under the conditions, but really struggled getting the boot to stick. The soft rubber wasn't very conducive to getting stuck well, and the boots were a little warped already. They ran out of Super Glue trying to get the first one done, so we used Sikaflex again for the other drive, as the tide was starting to come back in.
Meanwhile as we'd been working, a big black storm built to the SE of us, and started to move in and blot out the moon. We could hear the wind howling in the trees ashore, and I was again worrying about being exposed and the weather. But when I switched on our wind instrument, we had only about 5 knots. Fortunately, we were well protected from this storm.
While Jon and Chris and Liz were working on the boots, Dave and I were filling the saildrives with gear oil. By 0430, everything was done, and there was nothing left to do but wait for the tide (and hope the wind died out). The last thing our weary helpers did was drag the heavy bow anchor back close enough where we could lift it easily when the tide came in.
When it was time to take our friends back to their boats, the tide was still out enough that he dinghy was still high and dry. But the slippery grass made it easy to drag the dinghy out to the water, still about 50 ft away. By the time he came back to Soggy Paws, the water was up enough that he could drag the dinghy close enough to secure it to the boat.
AT 0730, we felt the first bump, meaning the tide was starting to lift us off the sand/grass. About 0810 we were floating enough to kedge ourselves outward using the stern anchor, and by 0820 we were anchored back next to the other 2 boats. The Fortress was so dug in that we put a buoy on it and left it to retrieve with the dinghy. It took Dave a good 10 minutes of standing there and wiggling and digging around the flukes to get that anchor free.
We all planned to stay there for the day and rest up, get ready for passage-making, and wait for Berzerker to arrive from Biak. But about 1030, a boatload of locals, including the head man we had "talked" to, came by our boats asking for money. We felt that we had used their beach, and didn't mind giving them 100,000 Rp ($7 USD). The other two boats were reluctant, because once the locals receive money from one boat, they are going to expect it from everyone else who stops there. Reluctantly one boat gave them 20,000 Rp, and the 3rd boat refused, saying it's not customary to charge anchoring fees in Indonesia. The local men were happy with our 100K, but not happy with the other two boats, and the vibe wasn't good. So we collectively decided to pick up anchor and move to another anchorage, another atoll, 13 miles to the west.
Though we were all tired, we had a fairly pleasant sail and managed to find a good anchorage in NW conditions at Manggawandi. We were pleased to find that both saildrives seemed to be working OK, and no milky stuff in the gear oil. We had used both engines at idle speed to motor off the beach and out to the anchorage, and started out with just the port engine.
Once we started the starboard engine to motor in to our new anchorage, it shutdown on an overtemp after running at speed for about 10 minutes. Obviously we had a cooling water issue in that drive, from running the drives while we were hauled out (to circulate clean diesel in the lower unit, prior to refilling with gear oil, to flush the salt water out). We switched to the port engine and carried on in to the anchorage. Dave eventually spent half a day getting the starboard saildrive cooling water circulating again.
Manggawandi is a very large bay with a nice sand area in about 30 ft. One friendly person stopped by in a canoe and told us we were welcome, and did not ask for money. We could see and hear the surf breaking out on the reef, but the anchoring area was pretty good. 01-17.636S / 136-36.364 E
Berserker finally sailed in at sunset. We had a short happy hour on Indigo, and planned leaving for the Ninigos in the morning.
-----
At 1/28/2019 2:15 AM (utc) our position was 01°13.32'S 144°17.96'E
Sunday, March 18, 2018
Finally Back in the Water
After nearly 6 months "on the hard" at Holiday Oceanview Marina, Samal Island, Mindanao, Philippines, we are back in the water. During the time we were hauled out, we spent 2 months working really hard on maintenance and improvements. The rest of the time we were traveling, including short trips to Hong Kong and Seoul South Korea, nearly 3 months in the US, and a 3 week trip to Cambodia and Thailand.

Headed Back Into the Water at Holiday Oceanview Marina
The primary impetus for the haulout, so soon after our last one, was continuing problems with the lower half of our SD20 saildrives. When we bought the boat, the saildrives had evidence of pretty severe galvanic corrosion, but we loved the rest of the boat so much that the alarm bells didn't ring loud enough. (We did get 3 years of use out of them.). But when we were in Indonesia last year, we continued to struggle with issues related to the corroded lower assemblies.
Dave thought that we could just buy the outer aluminum housing, and that would fix our primary problem. But Yanmar doesn't sell just the outer housing. So in September we bit the bullet and ordered 2 SD20 full lower assemblies. After checking with the Yanmar dealer in the Philippines, and pushing for a quote and delivery for nearly 2 weeks, we finally got a price (outrageous) and delivery "we don't know when we can deliver them". So, we finally ordered 2 new units from Mastry Engine Center in Florida, the SE USA Yanmar dealer.
We ordered the heavy bulky items to be shipped to my sister's house in Atlanta, so we could immediately arrange to ship them sea freight, so they'd be in the Philippines when we arrived back in December. But the customs laws were changing in the Philippines, and in September, when we arrived in Atlanta, it was uncertain whether we could ship them duty free. So then we decided we'd have to take them back in our luggage!!
By December when we arrived back at my sister's house to organize ourselves to fly back to the Philippines, we had received clarification on the shipping issue and decided to go ahead and ship them sea freight rather than trying to get them there in our fly-in luggage. In the end, they arrived in the Philippines intact, at a very reasonable rate, no duty required. But it took nearly 3 months for them to reach us in Davao. (We knew this when we made the decision to ship vs carry).
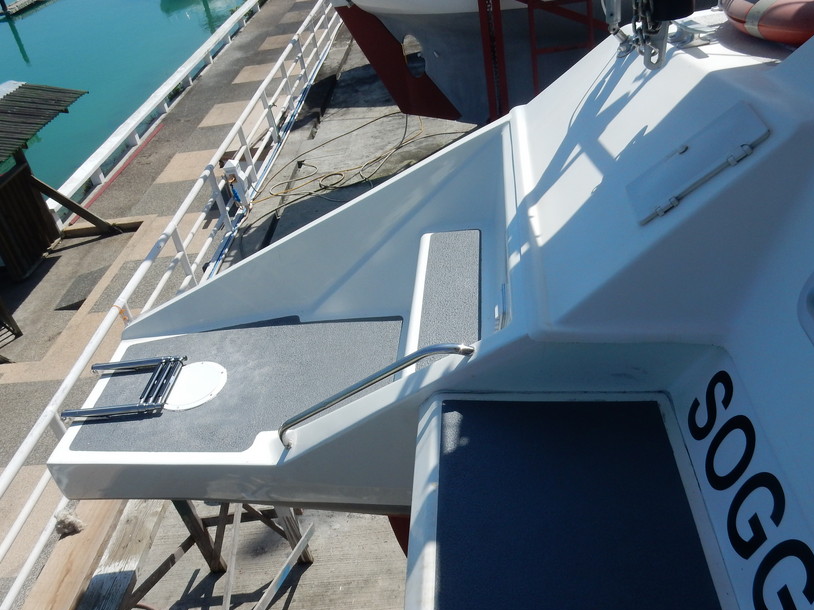
Meanwhile we had other projects to keep us busy. The biggest was "transom extensions" (aka enlarged swim platforms). We cruised last year in Indonesia with Ocelot, who had done this on their boat. Because we are "over design weight", the steps down the aft end of our two hulls are lower in the water than designed. The bottom step was always "a-slosh" resulting in rapid algae growth. No matter how often we scrubbed the top surface of the bottom step, it was always very slippery (and looked frightful too).

Original Stern on the Port Hull
So Dave and the marina carpenters designed and constructed a 1 foot extension on the stern on each hull that raised the lowest step to the height of the next higher step (about 6"). This did two things--make a nice wide, flat "landing area" on the stern; and raised the bottom step around 6", so it is no longer "a-slosh" when sitting at anchor in normal conditions. It also extended our waterline length another foot, but I'm not sure this is significant in a catamaran. It also added buoyancy to the aft end of the boat, so we weren't "dragging ass" so much.
The extensions were fashioned from boat construction foam and honeycomb, plus a little fiberglass and epoxy. The result was a very professional looking job and fabulous in form and function. Here is one picture of the end result:

Finished Swim Platform on the Port Hull
For a full set of photos of the extensions under construction, see this photo album: Aft Step Extension
A third major project we completed in January, while waiting for the saildrive parts to show up, was to build a big sturdy "helm seat" from the leftover foam we had from the extension project. The boat came with a low-end post-mounted wobbly plastic captain's chair. It wasn't high enough for me to see the bow of the boat (or ahead of the boat) while sitting down, and it was uncomfortably wobbly in a sea. That meant that I'd have to stand while driving (or sit in cheap wobbly plastic chairs we have on the wing deck). We had already done emergency repairs on it to make it last as long as it had.
Our friends on Tackless Too had a nicely crafted stainless steel "captains chair". custom made by a welding shop. It was gorgeous, but expensive, and heavy. Dave knew the marina carpenters could make us a great chair with our leftover foam. And they did!

Our New Spiffy Helm Chair

It was designed to be wide enough that the two of us can sit there comfortably and see what's going on at the same time. It is a fabulous addition to both comfort and safety underway. And though it looks very heavily built, the construction foam makes it very light. Plus we designed in ample storage for all our cockpit "stuff".
Meanwhile, my job was "Chief Purchasing Officer", "Expediter" and "Technical Research Officer". I spent a bunch of time on the computer sourcing both parts and information, arranging shipping, and tracking shipments. Of course, once the saildrives arrived, we found we were missing a couple of critical gaskets. So I had to find a source for them and get them to the Philippines "quickly". We ended up with 3 "rush" shipments in the end, for which we used a Philippine company called Johnny Air. They have offices in NY and California where you can send a package, and they handle the Customs clearance in Manilla and get it to us in Davao in a timely fashion (about 10-14 calendar days, usually). Neither DHL or FedEx are recommended for rush shipments of goods into the Philippines, as stuff gets tied up in Customs, sometimes for weeks and for hundreds of extra dollars in Customs and agent fees. Not sure how JohnnyAir manages, but they do.
If Dave needed to know how to do anything on the engines, or other projects, I searched online forums and Youtube for just the right information, and collated it all for him to use.
I also had a number of maintenance projects in the sewing arena. Our dinghy cover first purchased in Colombia in 2008 needed some more TLC. The sunbrella is good as a cover, but it does't hold up to the rugged use of the dinghy. Lots of plastic chafe protection added in various places, plus I had to completely rebuild the aft end of the tube covers. I also completely rebuilt/reinforced the mainsail cover/Stackpack. It needed a new 20-foot zipper plus needed a flap to cover the zipper so the UV doesn't get to it. And patches and restitching in several places. I added a second layer of cloth on the top flap of the stackpack, to provide more UV protections, and some reinforced drain holes in the bottom, so rain water wouldn't stand inside the cover.
My biggest project, which I put off and put off, because I knew it was going to be very difficult to do a good job, was to finish the cockpit enclosure I had started the year before. Before, I had done the easy part--roll-down sides--straight lines--easy peasy (but still took 2 weeks to finish). And the year before that, I had adapted the original front "window" part to our new hardtop. What was missing was the corner pieces. The way our cockpit is, there are complex curves in the corner everywhere, and I just couldn't figure out how I was going to shape the thing. It was a daunting project. But it had to be done, and there is no "canvas place" in Davao that I could hire to do it. Fortunately, my sewing friends on s/v Carina had told me that I should be using patterning material for jobs like that. So one of the shipments we got from the US was some more clear vinyl for the windows, and the patterning material and double-sided tape. Wow, that stuff is so easy to work with--after watching a 15 minute video by Sailrite, I was an expert. My corner windows turned out really well (for an amateur job).
Fortunately for me, because my sewing list was so long, there's a nice Filipino tailor with a sewing machine near the marina, and Dave gave him all the easy projects (the smaller stuff, covers, etc). Ariel the Tailor does great work. He did the cushions for the helm chair (above), as well as new covers for our Man Overboard Module, and the rope reel hanging off the stern rail, new windlass cover, and a "line bag" for the reefing lines under the boom.
Dave and his Filipino helper, Alex, also took the lids off all 14 hatches on the boat, and cleaned up everything, checked the locking handle mechanisms, checked the gaskets, and fixed the two leaky hatches.
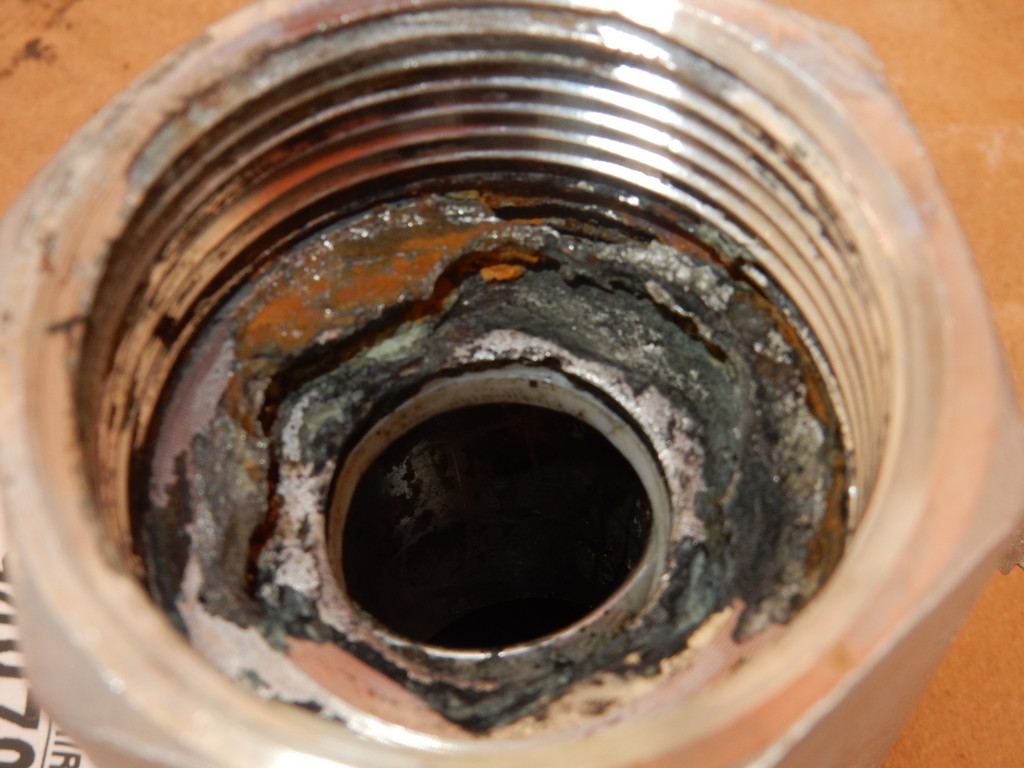
Dave and Alex also replaced the 8 below-water through-hulls. The old bronze and stainless ones were looking pretty shaky, and a friend on another St. Francis warned us that his had crumbled in his hands when he tried to remove them. A couple of ours did the same! We replaced them with new composite through-hull and ball valve fittings from Tru-Design in NZ (sourced via Defender and shipped via JohnnyAir).

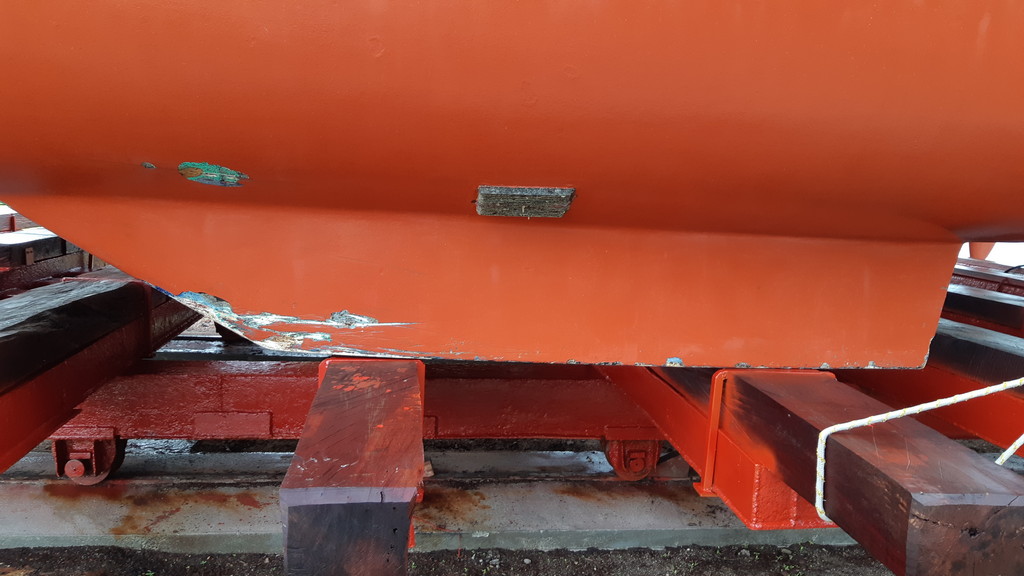
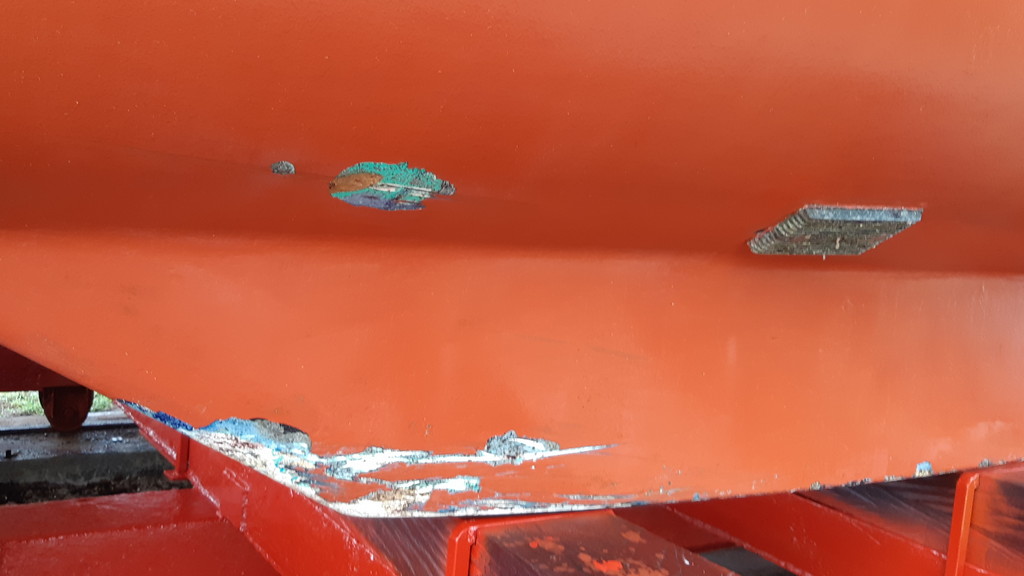
Old Corroded (Crumbling) Through Hull
Dave and Alex also did a bunch of preventive maintenance on the Yanmar engines, including rebuilding the raw water pumps, and mounting a matched set of new alternators with fancy electronic alternator regulators (designed to be compatible with a Lithium battery bank in the future). They also rewired a bunch of the start battery circuit to add an "always on trickle charge" mechanism for the start battery.
So, it was a very fruitful haulout. We were scheduled to launch March 15 during an appropriate high tide window. But we didn't get the final gaskets until a couple of days before that, and Dave and Alex still had to put the engines together!! Amazing that we could go in on the 17th, just 2 days late!! (Dave is AMAZING).
Whew! It's great to be floating again!!
The primary impetus for the haulout, so soon after our last one, was continuing problems with the lower half of our SD20 saildrives. When we bought the boat, the saildrives had evidence of pretty severe galvanic corrosion, but we loved the rest of the boat so much that the alarm bells didn't ring loud enough. (We did get 3 years of use out of them.). But when we were in Indonesia last year, we continued to struggle with issues related to the corroded lower assemblies.
Dave thought that we could just buy the outer aluminum housing, and that would fix our primary problem. But Yanmar doesn't sell just the outer housing. So in September we bit the bullet and ordered 2 SD20 full lower assemblies. After checking with the Yanmar dealer in the Philippines, and pushing for a quote and delivery for nearly 2 weeks, we finally got a price (outrageous) and delivery "we don't know when we can deliver them". So, we finally ordered 2 new units from Mastry Engine Center in Florida, the SE USA Yanmar dealer.
We ordered the heavy bulky items to be shipped to my sister's house in Atlanta, so we could immediately arrange to ship them sea freight, so they'd be in the Philippines when we arrived back in December. But the customs laws were changing in the Philippines, and in September, when we arrived in Atlanta, it was uncertain whether we could ship them duty free. So then we decided we'd have to take them back in our luggage!!
By December when we arrived back at my sister's house to organize ourselves to fly back to the Philippines, we had received clarification on the shipping issue and decided to go ahead and ship them sea freight rather than trying to get them there in our fly-in luggage. In the end, they arrived in the Philippines intact, at a very reasonable rate, no duty required. But it took nearly 3 months for them to reach us in Davao. (We knew this when we made the decision to ship vs carry).
Meanwhile we had other projects to keep us busy. The biggest was "transom extensions" (aka enlarged swim platforms). We cruised last year in Indonesia with Ocelot, who had done this on their boat. Because we are "over design weight", the steps down the aft end of our two hulls are lower in the water than designed. The bottom step was always "a-slosh" resulting in rapid algae growth. No matter how often we scrubbed the top surface of the bottom step, it was always very slippery (and looked frightful too).
So Dave and the marina carpenters designed and constructed a 1 foot extension on the stern on each hull that raised the lowest step to the height of the next higher step (about 6"). This did two things--make a nice wide, flat "landing area" on the stern; and raised the bottom step around 6", so it is no longer "a-slosh" when sitting at anchor in normal conditions. It also extended our waterline length another foot, but I'm not sure this is significant in a catamaran. It also added buoyancy to the aft end of the boat, so we weren't "dragging ass" so much.
The extensions were fashioned from boat construction foam and honeycomb, plus a little fiberglass and epoxy. The result was a very professional looking job and fabulous in form and function. Here is one picture of the end result:
For a full set of photos of the extensions under construction, see this photo album: Aft Step Extension
A third major project we completed in January, while waiting for the saildrive parts to show up, was to build a big sturdy "helm seat" from the leftover foam we had from the extension project. The boat came with a low-end post-mounted wobbly plastic captain's chair. It wasn't high enough for me to see the bow of the boat (or ahead of the boat) while sitting down, and it was uncomfortably wobbly in a sea. That meant that I'd have to stand while driving (or sit in cheap wobbly plastic chairs we have on the wing deck). We had already done emergency repairs on it to make it last as long as it had.
Our friends on Tackless Too had a nicely crafted stainless steel "captains chair". custom made by a welding shop. It was gorgeous, but expensive, and heavy. Dave knew the marina carpenters could make us a great chair with our leftover foam. And they did!

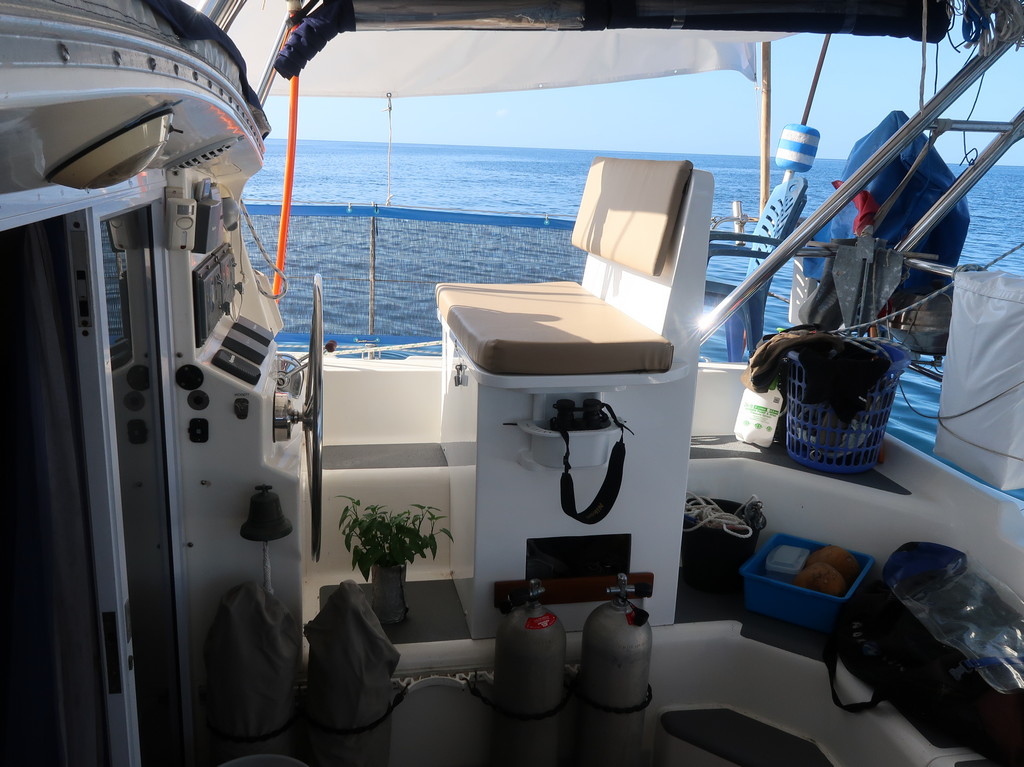
It was designed to be wide enough that the two of us can sit there comfortably and see what's going on at the same time. It is a fabulous addition to both comfort and safety underway. And though it looks very heavily built, the construction foam makes it very light. Plus we designed in ample storage for all our cockpit "stuff".
Meanwhile, my job was "Chief Purchasing Officer", "Expediter" and "Technical Research Officer". I spent a bunch of time on the computer sourcing both parts and information, arranging shipping, and tracking shipments. Of course, once the saildrives arrived, we found we were missing a couple of critical gaskets. So I had to find a source for them and get them to the Philippines "quickly". We ended up with 3 "rush" shipments in the end, for which we used a Philippine company called Johnny Air. They have offices in NY and California where you can send a package, and they handle the Customs clearance in Manilla and get it to us in Davao in a timely fashion (about 10-14 calendar days, usually). Neither DHL or FedEx are recommended for rush shipments of goods into the Philippines, as stuff gets tied up in Customs, sometimes for weeks and for hundreds of extra dollars in Customs and agent fees. Not sure how JohnnyAir manages, but they do.
If Dave needed to know how to do anything on the engines, or other projects, I searched online forums and Youtube for just the right information, and collated it all for him to use.
I also had a number of maintenance projects in the sewing arena. Our dinghy cover first purchased in Colombia in 2008 needed some more TLC. The sunbrella is good as a cover, but it does't hold up to the rugged use of the dinghy. Lots of plastic chafe protection added in various places, plus I had to completely rebuild the aft end of the tube covers. I also completely rebuilt/reinforced the mainsail cover/Stackpack. It needed a new 20-foot zipper plus needed a flap to cover the zipper so the UV doesn't get to it. And patches and restitching in several places. I added a second layer of cloth on the top flap of the stackpack, to provide more UV protections, and some reinforced drain holes in the bottom, so rain water wouldn't stand inside the cover.
My biggest project, which I put off and put off, because I knew it was going to be very difficult to do a good job, was to finish the cockpit enclosure I had started the year before. Before, I had done the easy part--roll-down sides--straight lines--easy peasy (but still took 2 weeks to finish). And the year before that, I had adapted the original front "window" part to our new hardtop. What was missing was the corner pieces. The way our cockpit is, there are complex curves in the corner everywhere, and I just couldn't figure out how I was going to shape the thing. It was a daunting project. But it had to be done, and there is no "canvas place" in Davao that I could hire to do it. Fortunately, my sewing friends on s/v Carina had told me that I should be using patterning material for jobs like that. So one of the shipments we got from the US was some more clear vinyl for the windows, and the patterning material and double-sided tape. Wow, that stuff is so easy to work with--after watching a 15 minute video by Sailrite, I was an expert. My corner windows turned out really well (for an amateur job).
Fortunately for me, because my sewing list was so long, there's a nice Filipino tailor with a sewing machine near the marina, and Dave gave him all the easy projects (the smaller stuff, covers, etc). Ariel the Tailor does great work. He did the cushions for the helm chair (above), as well as new covers for our Man Overboard Module, and the rope reel hanging off the stern rail, new windlass cover, and a "line bag" for the reefing lines under the boom.
Dave and his Filipino helper, Alex, also took the lids off all 14 hatches on the boat, and cleaned up everything, checked the locking handle mechanisms, checked the gaskets, and fixed the two leaky hatches.
Dave and Alex also replaced the 8 below-water through-hulls. The old bronze and stainless ones were looking pretty shaky, and a friend on another St. Francis warned us that his had crumbled in his hands when he tried to remove them. A couple of ours did the same! We replaced them with new composite through-hull and ball valve fittings from Tru-Design in NZ (sourced via Defender and shipped via JohnnyAir).
Dave and Alex also did a bunch of preventive maintenance on the Yanmar engines, including rebuilding the raw water pumps, and mounting a matched set of new alternators with fancy electronic alternator regulators (designed to be compatible with a Lithium battery bank in the future). They also rewired a bunch of the start battery circuit to add an "always on trickle charge" mechanism for the start battery.
So, it was a very fruitful haulout. We were scheduled to launch March 15 during an appropriate high tide window. But we didn't get the final gaskets until a couple of days before that, and Dave and Alex still had to put the engines together!! Amazing that we could go in on the 17th, just 2 days late!! (Dave is AMAZING).
Whew! It's great to be floating again!!
Friday, August 25, 2017
Doing Fine - Back in the Philippines
I keep meaning to get on with the remaining blog posts on our time in SE Indonesia, but we are back in the boatyard in the Philippines with a long list of projects, so I haven't got around to it yet. Hopefully I will soon.
Our current location is Holiday Oceanview Marina, Samal Island, Davao del Norte, Mindanao, Philippines, and we are fine and healthy. We had a great time cruising Indonesia--they have made amazing progess in making it easier for small private yachts to cruise their beautiful islands. The new boat performed exceptionally, well even in the leg from Halmahera to Bitung, N Sulawesi, where we were close-hauled in 40 knots of wind with opposing current. The new Soggy Paws is a dream to sail, though much less rugged than our CSY.
Blog Posts I'm missing so far:
- Coast hopping from Triton Bay to Misool
- Misool back to Bitung
- Bitung to Samal Island, Philippines
Our original plan was to spend the summer in Raja Ampat again, but in June we discovered that the new seals that Dave put in the saildrives were leaking, and the leak got progressively worse. To fix the problem, we'd need to haul out somewhere, and there isn't a reasonably-priced haulout yard in Eastern Indonesia. And Samal was only about 800 miles downwind, plus we could get much better provisions in the Philippines than in Indonesia. So we spent late June and July coast-hopping back to Samal.
We emailed the Oceanview Marina yard in early June and requested a haulout as soon as they could accommodate us near the end of July. The yard is chock-a-block (though the marina is not), but they managed to juggle spots in the yard to haul us out a few days after we arrived. We have pulled the saildrives apart and are now trying to source parts.
There is a Yanmar dealer in the Philippines, but they mainly sell tractors and not small yacht engines/saildrives. So after 3 weeks of trying to get some technical questions answered, and get a quote and availability for our saildrive lower units, we gave up.
We got the quote with "If the parts ship from Singapore, they will take 10-12 working days to arrive, if they ship from Japan, they will take 15-20 days to arrive, but there are none in either Singapore or Japan." WTF? After finding they'd have to ship the parts we needed from the US, we have decided to buy the parts from a US dealer. Due to the fact that the Philippines don't acknowledge "yacht in transit" status for duty, they may well come back with us in a suitcase! Note: Primary reason we are contemplating replacing the whole Lower Housing Assembly (aka Lower Unit) is that the aluminum housings are pitted from galvanic corrosion. We tried to repair them on our last haulout, but the pitting is bad enough that the seals weren't sealing well. Since we like to do the "far from everywhere" cruising, we feel it's best to replace rather than keep dealing with the issue, and risk a major problem somewhere where we can't deal with it.
While back in the marina and hauled out, Dave also decided to get the excellent fiberglass workers in the yard to make a 1 ft extension on our sterns. This is primarily to raise the bottom step. With a little too much weight aboard, our bottom step on the sterns were always wet, and grew slippery green slime at an amazing rate, making the step very dangerous. We are raising the bottom step to the level of the next step up, plus adding a foot, which will hopefully add some buoyancy back there. And it will make large flat landing area--good for a dive platform. The yard guys are nearly done with the project. Pictures soon!
I am meanwhile working down the fairly extensive list of canvas repair items and upgrades (bleah! I hate patching old canvas) Plus sourcing parts, googling for troubleshooting tips (Raymarine Wind Inst and Seatalk / PC connector), making travel reservations, updating Compendiums, and keeping in touch with our wide world of friends at home and in the cruising community. It's a full time job!!
We head home to the US in mid-September for a 2 month visit, with plans to try to see all our family, and catch the SSCA Annapolis Gam, Annapolis Sailboat Show, and Melbourne SSCA Gam (by car).
For several reasons, we have also decided to alter our 2018 plans. We will put our PNG/Solomons trip off for another year, waiting for a compatible buddy boat to make their way east from Malaysia to go with us. And it seems a shame to blast away from the Philippines without having actually cruised here. After watching our friends on Mokisha work their way through the central Philippines (on Facebook), it rekindled our interest in cruising and diving there. Plus there is a lot of "inland touring" in SE Asia we still haven't done. So our loose plan is to try to see maybe a little of Australia, and some of Thailand, Laos, Cambodia, and Vietnam by land, and cruise central Philippines by sea.
Saturday, March 11, 2017
Painting the Deck with Not Really Kiwi Grip
It all started when Dave heard while hanging out on "The Balcony of Knowledge" at Oceanview Marina about this local product that was "the same as Kiwi Grip but MUCH cheaper". (Kiwi Grip is a deck painting product made and marketed out of New Zealand. It has a great reputation, but is very expensive).

Almost Like Kiwi Grip
First, let me explain about The Balcony of Knowledge. There is no bar or restaurant at Oceanview Marina. However, there is a nice balcony and an "honor bar"--a refer stocked with beer, water, and sodas. And there's a killer view of the sunset (and a welcome breeze) from the balcony. So cruisers hanging out in the marina tend to congregate for a cold beer and a little breeze to watch the sun goes down. You can learn some amazing things on this balcony. Cruisers from all over the world are working on their boats in the marina, and they are happy to share their knowledge and their opinions.
The way I heard it, some cruiser had painted his deck with this stuff 10 years ago and was very satisfied with it. He told Marcel on s/v Mintaka San about this locally-available, inexpensive deck paint. Marcel went right down to the hardware store, bought the stuff, and put it on his deck. (Later, I directly queried the original guy, and he hadn't really used the Philippine product, but something very similar, in the general category of an "elastomeric roofing sealer".) Dave took a look at the job that Marcel did with it on Mintaka San, and liked what he saw. Meanwhile, he told another cruiser about it, who also put it on his deck.
Dave's favorite "deck shoe" is a pair of fancy Croc-like flip-flops. These are easy-on shoes, and comfortable on the foot. But deck shoes they ain't. And our deck on the new Soggy Paws isn't very grippy. When it gets wet, it's a little slippery, especially with Dave's favorite slick-bottomed shoes. So Dave has been wanting to do "something" with the deck. He had previously re-done the decks on the old Soggy Paws with epoxy and "sand", and he knew how much work it was to get a good finish and an even layer of sand. He did a little reading about Kiwi-Grip and how easy it is to apply, and he was hooked on the idea. I wasn't so sure.
I Googled for hours, trying to find someone else who had used THIS product on his deck. I couldn't find one. I did find out a lot of information about Kiwi Grip, which did sound like a wonder product.
The key to the whole process is a thick, latex-based "elastomeric" paint, and a special "loopy" roller that gives the paint texture. (If you buy the kit from Kiwi Grip, you get paint made for marine deck paint, the loopy roller, and detailed instructions). Basically, you goop on the paint, let it dry until it's almost tacky, and then roll it with the loopy roller, which makes a nice textured surface. By varying how thick the paint is and how long you let it dry before rolling it with the loopy roller, you can control how aggressive the textured surface is. Kiwi Grip strongly recommends practicing on something non-critical to get the technique right before starting on highly visible parts of your deck!
So we started stockpiling the Primero brand Elastomeric Roofing Sealer. The hardest part was finding enough white to mix with the light grey "Cosmic Sand" color to make the color a very very light grey. (Too dark, even a little dark, and the deck is blazing hot on bare feet). We scoured every hardware store and paint shop in Davao to accumulate enough paint (8 gallons in all) to do our deck. We were looking for a 3:1 mixture, so we had 6 gallons of white and 2 gallons of Cosmic Sand, at a cost of about $20USD per gallon. The loopy rollers were fortunately in stock at Citi Hardware (though we'd been offer the loan of a pair of Kiwi Grip rollers by another cruiser). (We ended up having to run down to Ace Hardware at the end and buy another 3 gallons of paint--and we could only find 2 gallons of white, so we ended up with about 1/3 gallon of Cosmic Sand left over).
Since the paint is so thick, there's no tedious deck prep. You just have to make sure there's no greasy residue and no flakey bits on your old deck paint. Our helper Alex and another painter prepped our deck in one day. They scrubbed the whole deck on hands and knees with a stiff brush and soap and water. Then, with socks on to keep from making greasy spots on the deck, they taped off the non-nonskid areas with painters tape. Then they applied the paint in 3ft x 3ft sections. With the exception of one unexpected rain shower, the actual painting was complete in 3 days (port side, starboard side, cockpit area).

Clearing the Decks for Painting

Alex and Kim Each Working on Small Sections of Deck


See the Goopy Wet Section, Unrolled, in the Foreground

Alex Feeling Good About the Job
The rain shower... we were waiting for a couple of dry days to do the painting, and we were antsy to get going, so we got started a day early. The guys had just finished the 2nd section aft of the starboard bow, and a little rain cloud popped over the hill. It poured for about 15 minutes. Since it is latex-based (water based), all the paint they had just applied just washed off!! Once things dried out again the next morning, they just painted it again--no problems.

Finished Deck

Our "Aggressive" Finish Up Close
It took a week for the deck to dry fully, since the paint was applied so thick. It IS grippy! Thank God Dave decided not to paint the actual seats in the cockpit area--it's much too "aggressive" for sitting on in a bathing suit.
We'll report back in a year to let you know how it has turned out.
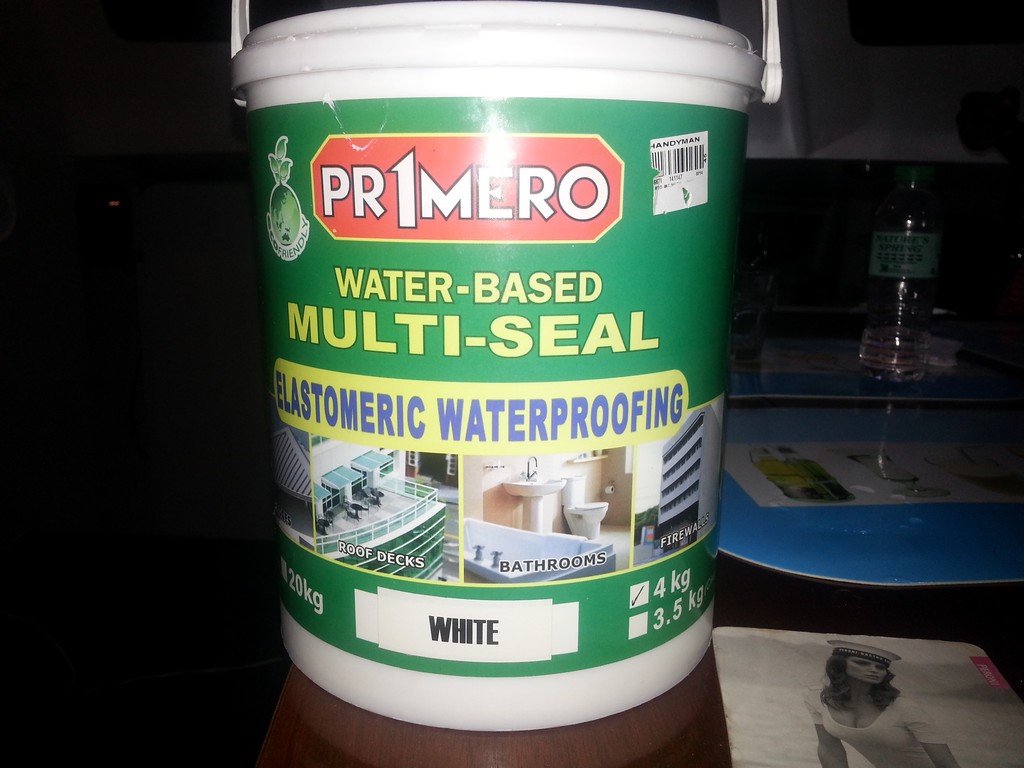
First, let me explain about The Balcony of Knowledge. There is no bar or restaurant at Oceanview Marina. However, there is a nice balcony and an "honor bar"--a refer stocked with beer, water, and sodas. And there's a killer view of the sunset (and a welcome breeze) from the balcony. So cruisers hanging out in the marina tend to congregate for a cold beer and a little breeze to watch the sun goes down. You can learn some amazing things on this balcony. Cruisers from all over the world are working on their boats in the marina, and they are happy to share their knowledge and their opinions.
The way I heard it, some cruiser had painted his deck with this stuff 10 years ago and was very satisfied with it. He told Marcel on s/v Mintaka San about this locally-available, inexpensive deck paint. Marcel went right down to the hardware store, bought the stuff, and put it on his deck. (Later, I directly queried the original guy, and he hadn't really used the Philippine product, but something very similar, in the general category of an "elastomeric roofing sealer".) Dave took a look at the job that Marcel did with it on Mintaka San, and liked what he saw. Meanwhile, he told another cruiser about it, who also put it on his deck.
Dave's favorite "deck shoe" is a pair of fancy Croc-like flip-flops. These are easy-on shoes, and comfortable on the foot. But deck shoes they ain't. And our deck on the new Soggy Paws isn't very grippy. When it gets wet, it's a little slippery, especially with Dave's favorite slick-bottomed shoes. So Dave has been wanting to do "something" with the deck. He had previously re-done the decks on the old Soggy Paws with epoxy and "sand", and he knew how much work it was to get a good finish and an even layer of sand. He did a little reading about Kiwi-Grip and how easy it is to apply, and he was hooked on the idea. I wasn't so sure.
I Googled for hours, trying to find someone else who had used THIS product on his deck. I couldn't find one. I did find out a lot of information about Kiwi Grip, which did sound like a wonder product.
The key to the whole process is a thick, latex-based "elastomeric" paint, and a special "loopy" roller that gives the paint texture. (If you buy the kit from Kiwi Grip, you get paint made for marine deck paint, the loopy roller, and detailed instructions). Basically, you goop on the paint, let it dry until it's almost tacky, and then roll it with the loopy roller, which makes a nice textured surface. By varying how thick the paint is and how long you let it dry before rolling it with the loopy roller, you can control how aggressive the textured surface is. Kiwi Grip strongly recommends practicing on something non-critical to get the technique right before starting on highly visible parts of your deck!
So we started stockpiling the Primero brand Elastomeric Roofing Sealer. The hardest part was finding enough white to mix with the light grey "Cosmic Sand" color to make the color a very very light grey. (Too dark, even a little dark, and the deck is blazing hot on bare feet). We scoured every hardware store and paint shop in Davao to accumulate enough paint (8 gallons in all) to do our deck. We were looking for a 3:1 mixture, so we had 6 gallons of white and 2 gallons of Cosmic Sand, at a cost of about $20USD per gallon. The loopy rollers were fortunately in stock at Citi Hardware (though we'd been offer the loan of a pair of Kiwi Grip rollers by another cruiser). (We ended up having to run down to Ace Hardware at the end and buy another 3 gallons of paint--and we could only find 2 gallons of white, so we ended up with about 1/3 gallon of Cosmic Sand left over).
Since the paint is so thick, there's no tedious deck prep. You just have to make sure there's no greasy residue and no flakey bits on your old deck paint. Our helper Alex and another painter prepped our deck in one day. They scrubbed the whole deck on hands and knees with a stiff brush and soap and water. Then, with socks on to keep from making greasy spots on the deck, they taped off the non-nonskid areas with painters tape. Then they applied the paint in 3ft x 3ft sections. With the exception of one unexpected rain shower, the actual painting was complete in 3 days (port side, starboard side, cockpit area).
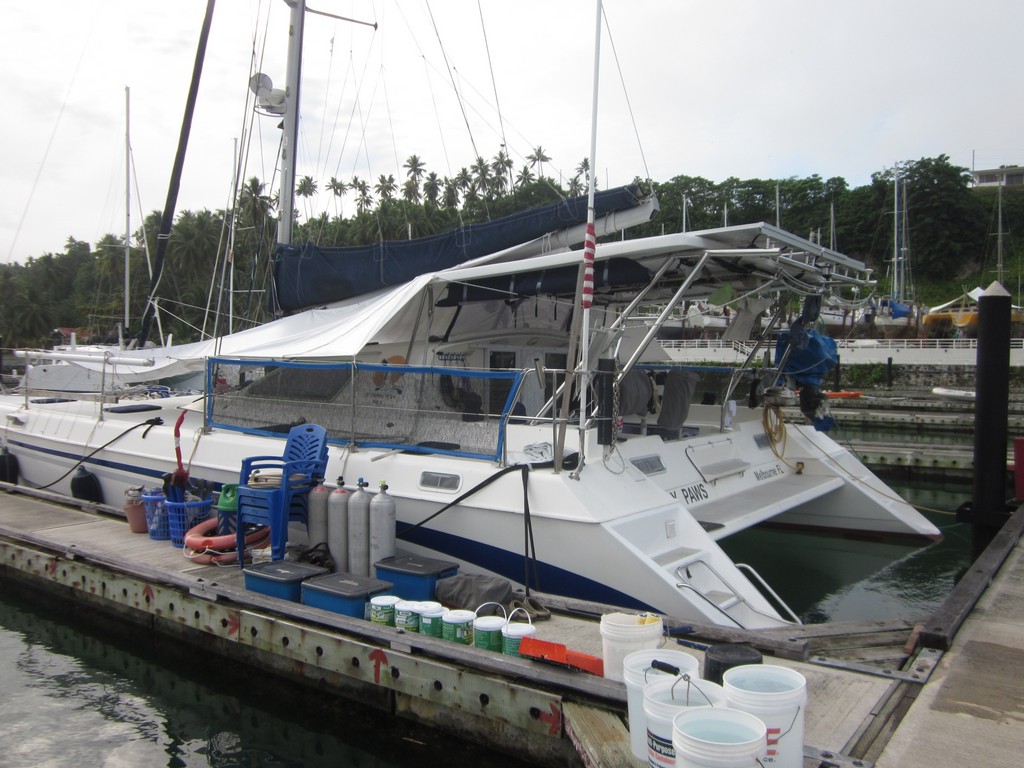


The rain shower... we were waiting for a couple of dry days to do the painting, and we were antsy to get going, so we got started a day early. The guys had just finished the 2nd section aft of the starboard bow, and a little rain cloud popped over the hill. It poured for about 15 minutes. Since it is latex-based (water based), all the paint they had just applied just washed off!! Once things dried out again the next morning, they just painted it again--no problems.
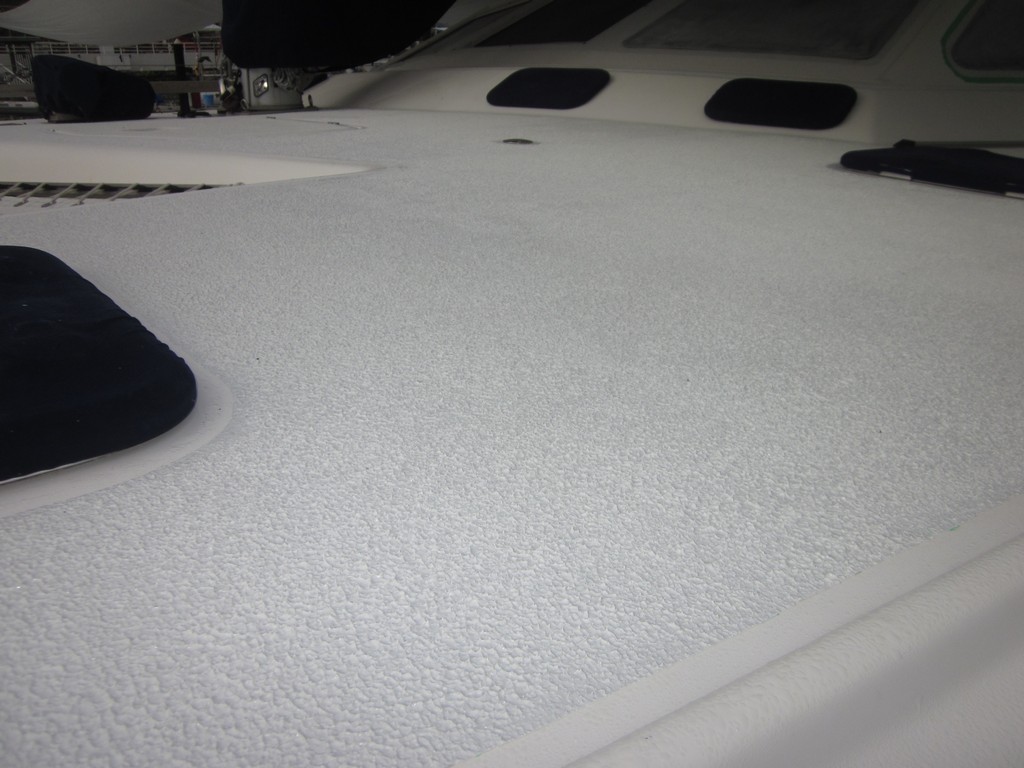
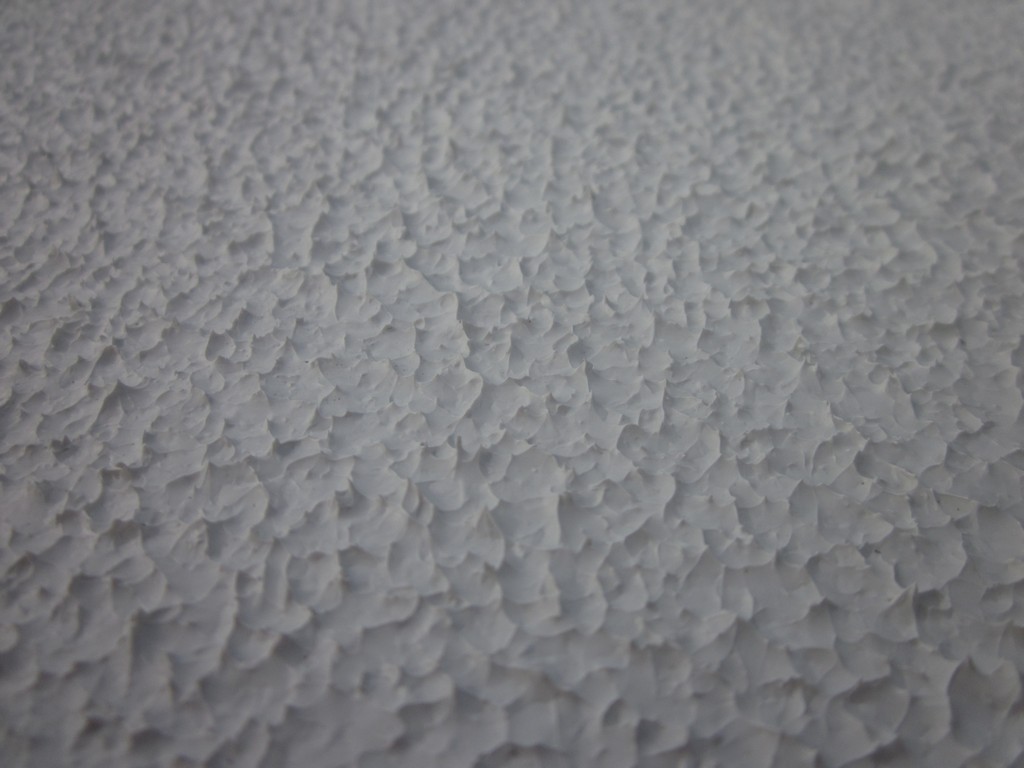
It took a week for the deck to dry fully, since the paint was applied so thick. It IS grippy! Thank God Dave decided not to paint the actual seats in the cockpit area--it's much too "aggressive" for sitting on in a bathing suit.
We'll report back in a year to let you know how it has turned out.
Subscribe to:
Comments (Atom)