Showing posts with label Fakarava. Show all posts

Sunday, February 18, 2018

Rice Wine for "Out There" Cruisers

This is for our friends cruising in the Bahamas, central South Pacific, Indonesia, and any other cruising grounds in remote places without reasonably priced stocks of wine.

Another cruising boat we met last year, Gaia, from Holland, gave us this recipe, which they passed on from another cruising boat. I include below the original recipe, and then what we did that worked for us.

I had previously looked into "making wine" a bunch of times over the past 10 years of cruising. But the instructions always seemed so complicated. For example...there was a huge debate on the forums about which esoteric wine yeast to use. It always put me off. And who had wine yeast aboard when you got desperate for some wine? And, didn't it take 2-3 years before the wine was drinkable?

This recipe is diffent--so simple--and 2-3 weeks to yield drinkable wine. For a bottom-shelf wine drinker, with no other recourse to wine, it's a pretty good solution--extremely affordable, and the ingredients are probably already on your boat.

Why would we make our own wine? When we were in Tonga, a TERRIBLE bottle of white wine was $25 USD! (if you could find one). In Indonesia, at least in the outer islands, you can't find wine, at all. In the Bahamas, liquor is not bad, price wise, but beer and wine is outrageously priced. So here goes.. original "sailor's wine" recipe, and exactly how we brewed on Soggy Paws last year in Indonesia.

Sailors rice wine recipe (original recipe)


Rice wine recipe makes 10 litres
1 kg white rice, washed and skim off the bugs
2.6 kg sugar
12 litres water
2 teaspoons yeast

Add options:
2 handfuls of raisins
2 lemons thinly sliced

Other add options:
Cranberries instead of raisins
Cherries instead of raisins
Oranges instead of lemons
Pomelo (sweet grapefruit)

You have to find out the quantities and flavours you like best.

Stir daily.
Cover with cloth or wrapping plastic with an elastic. So air can go out if necessary, but not in. Fermentation takes +/- 2 weeks.
Siphon into sterilized bottles. Let sediment settle for several days till the liquid is clear. Siphon into serving bottles.

To sterilize the bottles:
Just 1 or 2 drops of Betadine(Iodine)in a cup of water. Just let it in the bottles and container till you start using them. Use more water and Betadine for your container.
--------------

Here is what we did on Soggy Paws last year in Indonesia.

--------------------------------------------
For a gallon jug (US Measures)
--------------------------------------------
1 cup rice
4 1/3 cup sugar
water to fill gallon jug
2-3 tsp plain old bread yeast (I use a 10-11g package, which is a little more)
1-2 slices lemon or lime (or a tsp or 2 of some bottled lime or lemon juice)
A small handful of cranberries or raisins mixed

Don't cook the rice, just rinse it enough to get the bugs out (if necessary), and throw all the ingredients together in your brewing container.

I brew in a 1 gallon apple juice container, with the cap on very loose, and sitting in the sink in the head. WARNING: Big problems if you tighten the cap too much--it definitely needs to be able to off-gas! I did have a one gallon jug that we tightened up the cap, and it got a little too excited and sort of exploded and made a mess in the head. The jug and fermentation is much more volatile early on, and then tapers off. So if you are sitting for a week, good time to start a new jug.

I brewed in my jug for 2 weeks exactly (I tape a piece of blue tape with the due date). A little longer (3 weeks) tends reduce the sweetness. I tighten the cap, shake the jug well, and then loosend the cap again, at least once or twice a day.

My Rice Wine Brewing Kit


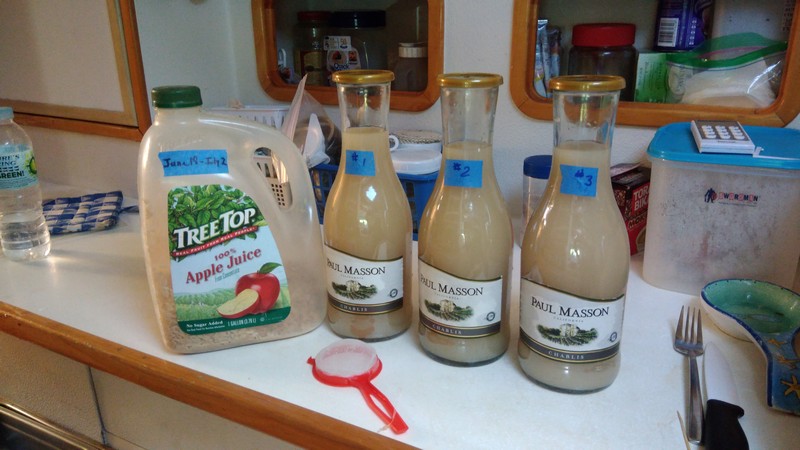
When it came to "siphoning off" to bottles, I did that one time with a proper siphon hose and decided that was too much trouble. I ended up just pouring my 2-week-old fermented rice wine from the gallon jug into the "clarifying" bottles, gently, using a funnel, and leaving the sludge in the bottom of the jug. I did filter what I poured off through a fine-mesh plastic filter (a plastic filter, a little cotton cloth, or a paper coffee filter might work also). What I used is the red "filter" in the foreground in the picture. I labeled my clarifying bottles 1, 2, 3 because the first one was easier to keep the sludge out than the last one. The #1 clarifying bottle generally had a little less "sediment" in it, and took less time to clear up. (In the end, for a thirsty person, it didn't matter).

Once the very fine sediment falls to the bottom of the clarifying bottle, the wine looks clear, and looks very much like white wine. Then siphon or pour gently off to your serving bottles. It takes at least 3-4 days for the stuff to settle to the bottom of the clarifying bottles, and the milky wine to turn clear. But if desperate, you don't have to wait that long! Chill well, and it's a decent substitute for that evening glass of white wine.

I have found that I have quite a bit of left over rice in the gallon jug. I tried re-using the rice (just adding a little more), but the brew ended up too sweet for some reason, so now I throw out the used rice and start new.

It was totally drinkable, and certainly better than paying $25/bottle for terrible wine. I sometimes use it to stretch my existing (cheap boxed) wine by mixing half and half.

Once I ran out of the wine I brought with me, I started making a 1 gallon jug every week or two. By the time I decanted it the gallon jug into "clarifying bottles", this turned into three 1 liter Paul Masson clarifying bottles. Once decanted to 750 ml "serving bottles" (leaving sludge in the bottom), it would make about 4 standard 750 ml wine bottles. With 2 1-gallon Jugs, and 3-4 Paul Masson bottles, I always had enough to share with my (also desperate) friends.

I never bothered testing the alcohol level--it was a good enough facsimile to wine that I wasn't worried about perfection.

I did use the Betadine method to sterilize the jugs and bottles.

Try it, and see how it works for you!

Wednesday, July 7, 2010

South Fakarava Revisited

Dates: June 26-July 3
Anchorage Location: S Fakarava Atoll, Tuamotus, French Polynesia 16°31.26'S / 145°28.35'W
We had a nice time revisiting South Fakarava again. This time we anchored on the other side of the pass, where we heard from others that the anchoring was much better. Charlie's Charts only shows an anchorage on the north side of the pass, which the electronic charts cover pretty well. But last time we found only depths of 45 feet and lots of coral, with little protection from any northerly winds. Below I'll list a couple of waypoints to get into the south side anchorage from the main channel.
We ended up anchoring in 12-15 feet, with good sand and only scattered coral heads. In this area there is enough space to easily anchor 10 or so boats. There is a shallow coral bar to the north, and another one to the south, and the rim of the atoll to the east, so there is reasonable protection from North around East to the SW. There are a number of uninhabited atolls with palm trees and beaches within dinghy distance of the anchor area.
It is a little longer dinghy ride from the south side to the pass to go diving. We spent one afternoon looking for a shortcut across the shallow reef between us and the pass, but never found much of a shortcut. We could get across at high tide by picking our way very carefully with the engine half-cocked, but at low tide, with tanks in the dinghy, we would have never made it. So it is about a mile and a half dinghy ride to the pass (but the pass is also mile from the anchorage on the north side).
We got very strong E-NE winds for a few days due to a passing high pressure south of us. But we did manage to fit in 2 pass dives and one lunch with Manihi at Pension Motu Aito.
Manihi's pension (guesthouse) is the one with the red roof just ashore from the north pass anchorage. It is much more extensive than it looks from the water. He stands by on VHF 08, and can arrange a very nice polynesian lunch or dinner for groups of cruisers (2000 CFP per person). If you have friends flying in who would rather stay ashore, this is a VERY nice place to hang out. Much nicer than the pension at Tetamanu. Check them out at www.fakarava.org or email motu-aito@mail.pf or PH 74-26-13.
We were waiting for light SE winds to hop up to Raraka, about 45 miles NE. But as the NE winds persisted, we decided to skip Raraka and head straight for Tahanea.
-----
At 7/2/2010 6:28 PM (utc) our position was 16°31.26'S 145°28.34'W
----------
radio email processed by SailMail
for information see: http://www.sailmail.com


Friday, May 28, 2010

Fakarava Diving

I can sum it up in one word... WOW!!


Sherry & the Sharks

We did 4 dives at the South Pass in Fakarava, and each dive got better. 3 of the dives were on the low tide slack and one was on the high tide slack. Best clarity was on the high tide slack... go at the end of the flood, when all the clean ocean water has been washing in for the past 6 hours. You just need to be careful not to mistime it, and end up being carried out on a strong ebbing tide.


Dave Gets a Close-Up

Basically we estimate the time of slack, get to the pass a little early, where you can actually see the conditions, and wait until it looks about right. Once the current slows, we get the rest of our gear ready, wetsuits on, etc, and take the dinghy into the pass, a little up-current from where we want to be. Then, without anchoring, we jump in the water, go down quickly, and then do the dive, drifting with the current and towing the dinghy behind us on a 100' leash. With the light winds we've had, towing the dinghy is not hard at all. It drifts at about the same pace we do, 75 feet below it.


Bill and Gram from s/v Visions of Johanna

The waypoint we used as our dive spot was 16-31.086S 145-27.679W. If the sea is calm you can start a little further out, but on a day with any offshore wave action, be careful going much further out. This spot is over a big sand trench that is easily visible from the surface. From here, once on the bottom, you head for the NE side of the pass (the one with buildings). The sharks are most numerous about 10 minutes into the dive (at a slow drift in). We heard that other side of the pass is good too, but the NE side was so good, we never got to the SW side.

On the best dive we had, the visibility was over 100', that's double or triple the visiblity on a typical 'good vis' Florida dive!

The big attraction of the South Pass is the sharks. There are over a hundred fairly docile sharks just hanging out in the pass. Mostly gray reef sharks, some black tips and some white tips.

Once you're tired of watching the sharks (thankfully, they just sit there mostly), there is a nice sloping wall full of coral and lots and lots of fish. And at the end of the dive, about a half mile of 15' reef. In the shallower water after the incoming current has picked up, you just fly over this part.

Because of the challenges of the drift dive and towing the dinghy, we only took our camera on the last dive. Dave got a couple of great shots of me and the sharks.


Tetamanu Dive Center

There is a dive shop in the South Pass, Tetmanu Dive Center. They declined to fill our tanks, though. Liability issues, they claimed. They did encourage us to dive with them, but we didn't see that they added much value to our approach with the dinghy. Though a first dive with them would probably be a nice way to get your feet wet.

The pass at the north end of Fakarava is much further from the anchorage, so we contracted with Te Ava Nui dive shop for a package of 3 dives. With 5 of us and 3 dives each, we managed to negotiate a package price of $50 US a dive, using our equipment and their tanks.


Headed Out to the N Pass with Te Ava Nui

There are 2 other dive outfits at the north end. These two are almost side-by-side about 3 miles south of town. You can anchor off in this area, but then it is a long hike (hitchhike/bicycle ride) to town. Both Top Dive, associated with Sunset Beach Resort, and Serge at Fakarava Diving Center get good reviews from divers, but Diving Fakarava is a smaller outfit with a more personal touch. On scubaboard.com they got rave reviews, but you probably need to book them in advance to make sure you get the dives you want in a limited time.


Fakarava Diving Center is Easily Recognizable by the Big Dive Flag

Te Ava Nui is the biggest outfit, so they always have dives going someplace. Typically they want to you do the outside-the-pass dive with them first, so they can assess your ability and comfort in the water. Their actual pass dive is quite challenging. They do not time the dive for slack current, so you are often diving in fairly strong current. And the first stop of the dive is at 100', which is pretty deep for a novice diver. They basically take you to the bottom quickly, and anchor you there--holding on for dear life to the dead coral--to watch the sharks and other pelagic fish. After 10 minutes of flapping in the current, the divemast signals, and the group lets go and drifts a fast drift over the bottom, up to about 70'. Toward the end of the dive, there is a depression in the bottom, and they take you down into this area to get out of the current and give you some time to look around.

All 3 north Fakarava dive shops also make trips to the south pass. Typically this is done as a 2-dive all-day trip, for about 2.5 times the normal cost of a 1-dive north pass dive.

Our preference overall was the South Pass, hands down. The ability to wait for slack current and drift more slowly was a big one. So if you only have time for one or two dives, our recommendation is the South Pass.


Dave Refilling Tanks on the Back of Soggy Paws

-----
At 5/27/2010 4:03 PM (utc) our position was 15°48.14'S 146°09.09'W

Thursday, May 20, 2010

Entering Fakarava at the South Pass


The South Pass at Fakarava, from Outside, on a Calm Day

Our plotted course from Tahanea to Fakarava hugged the atolls as much as possible, trying to take advantage of the protection from the ever-present swell. (Light wind + large swell = hell). This course took us close along the coast of Faaite, another small atoll. We had about 5 miles of 'open ocean' between the west end of Tahanea and the east end of Faaite, which we crossed easily just at sunset. The wind was still OK, and we let the genoa out full, and we didn't roll very much.

When we got to Faaite, we stayed close (a little scary in the dark, but we were trusting our accurate charts, and checked occasionally our distance off with radar). We had just enough sail out to make 2.5-3kts. The plan was to lurk along the N coast of Faaite until we could bear off NW to Fakarava (11 miles away) and just make the slack current at daybreak at 6am. We were sailing in company with John and Linda on Nakia (svnakia.blogspot.com). (Pronounced Na-KEE-ah)

We met up with them in Tahanea and have enjoyed their company. We tracked their trip from Marquesas to Hawaii last fall, and their sail back to the Marquesas this spring, via the Pacsea Net. So we were glad to finally meet them in person, and have been able to talk extensively about their experiences wintering in Hawaii last year.

On my watch, it a pleasant sail and I enjoyed playing with the sails to try to match speed with Nakia. And keep from running into them--since we each only had a single light showing, it was sometimes hard to see when we were getting close together!!

Just at the time I turned it over to Dave, the wind died completely. We still had 15 miles to go and 7 hours til daylight and slack tide. And we were still in the lee of Faaite. So Dave rolled in the Genoa and lashed the wheel on centerline, and we just drifted west at about half a knot under the triple-reefed main. (The sailors are asking... "Why do you have a triple-reefed main in 10 knots of wind?" Our power sail is the genoa, and it's much easier to handle when sailing off the wind, and to change sail area. We knew we would be stalling, so we just left the triple reef in the main when we raised it.

At 3am when Dave turned the watch over to me, I turned on the engine and headed straight for our waypoint outside the pass, timing our arrival for 5:45am. The wave action wasn't as bad as we'd feared, considering that the big blow we had a couple of days ago was still blowing further south. It had turned into a long swell. We rolled a little, but not bad.

On arrival at our waypoint, it was just starting to get light enough to see. We circled once and wait for the sun to actually come up, and then went in close to have a look at the pass. Dave opted to circle again to give us better light for actually entering the pass. It was a little scary looking from outside, because the big swell was crashing on the beach on both sides. Dave could see enough to tell that it was NOT crashing in the middle. At about 6am we finally got the courage to enter the pass--we thought it was on the last of the incoming tide. Once we got fully IN the pass, we could tell the tide had turned and we had a little current against us (which turned into 2.5 against us by the time we got to the narrowest portion of the pass).

The trickiest part of the whole entry was trying to figure out where to go inside the pass. There is a range that you use to stay lined up while coming in. The range, when you get close, turned into red channel marks, which you put on your port side, and there are 2 green sticks ahead, which you put on your starboard side (passing between the range and the green marks). The pass splits then after the green marks. We had tracks from another boat that went left, but we knew that Visions was anchored to the right, so we went right.


s/v Nakia in South Fakarava

Photos by Bill Strassberg s/v Visions of Johanna, from the Rigging


Soggy Paws at South Fakarava

Though it is a lovely area, the north side anchorage turns out to be a pretty crummy anchorage. It is very very corally. When we circled around a couple of boats anchored in 25-35' ahead of Visions, we could see the bottom profile on our fishfinder was very erratic--lots of high-profile coral. Out further, in 50', there was less profile, and we could see small patches of sand. So we finally dropped anchor in 50', and did NOT set the anchor. I went down later with the tail end of one of our used SCUBA tanks to survey the situation, and was able to pull the anchor into a sand spot, and unwrap the chain from the worst of the coral. (old dead coral) Dave buoyed the last 100' of chain by putting a pair of buoys about 50' from the bow. It's not perfect, but it will hold if we need it to. We may have to dive to free the anchor, though, when we try to leave.

We're keeping a close eye on the weather, but for now, the forecast is for less than 10 knots for the next 4 days. (Of course, this was also the forecast just before the big blow we had a week ago).

We managed a drift dive in the south pass on the mid-day slack. (more on diving in another blog post).
-----
At 5/19/2010 7:36 PM (utc) our position was 16°30.28'S 145°27.36'W